Day 1
We will cover:
- Introduction to course.
- Basic Unix.
- Introduction to HAWK.
- Basic Unix Continued.
- Fetch data with nf-core/fetchngs pipeline.
Course Introduction
You should have one of three questions:
- Have you found a nice bulk-RNAseq dataset from a paper and want to download and use it for your research?
- Have you recently generated bulk-RNAseq data and need to process and analyse it?
- You are planning a bulk-RNAseq experiment and would like to know how to process the data when the time comes?
What you will learn on this course:
- How to find and download sequencing data from online data repositories.
- How to process the sequencing data.
- How to analyse the sequencing data.
- How to interpret the analysed data.
What you won’t learn on this course:
- How RNAseq technology/process works. Please see this video for an overview.
- How to hack the mainframe and take over the world.
Basic Unix: Learning Objectives
- Learn the concept of using the command line.
- Learn how to navigate and manipulate files and data.
- Learn how to run and manage programs.
Basic Unix: Brief History
- UNIX is a suite of programs that make up an operating system (like Windows and Mac).
- First developed in 1960’s and has been in constant development ever since.
- It’s a stable, multi-use, multi-tasking system for servers, desktops, and laptops.
- UNIX systems also have a grahpical user interface (GUI), providing an easy to use Windows-like icon-based environment.
- Linux is a clone of UNIX (they’re the same thing). UNIX is a commercial product, whereas Linux is open-source (you can download, install, and use it).
- We will be using Linux on this course.
Basic Unix: Graphical User Interface (GUI) & Command Line/Shell
- All Windows/Mac/Linux PC’s use a GUI to allow users to easily navigate and use the PC.
- The GUI is what allows us to point and click on things, which in turn opens the respective programs etc.
- These operations can also be performed using the command line through the use of a shell.
This is a shell. We can use this to type commands etc.
Introduction to HAWK
- HAWK is Cardiff and Bangor universities High Performance Compute (HPC) system.
- Swansea and Aberystwyth universities use SunBird - both systems are run by Supercomputing Wales (SCW).
- Both HPC’s are the same, but set-up slightly different - we will be working with HAWK.
- If we need to run analyses/softwares/code that requires a lot of computing power, we need to use HPC’s.
- The way we interact with HAWK is through the command line via Bash.
- Think of HAWK as a computer that’s located in the cloud. We can connect to it via our Unix shells.
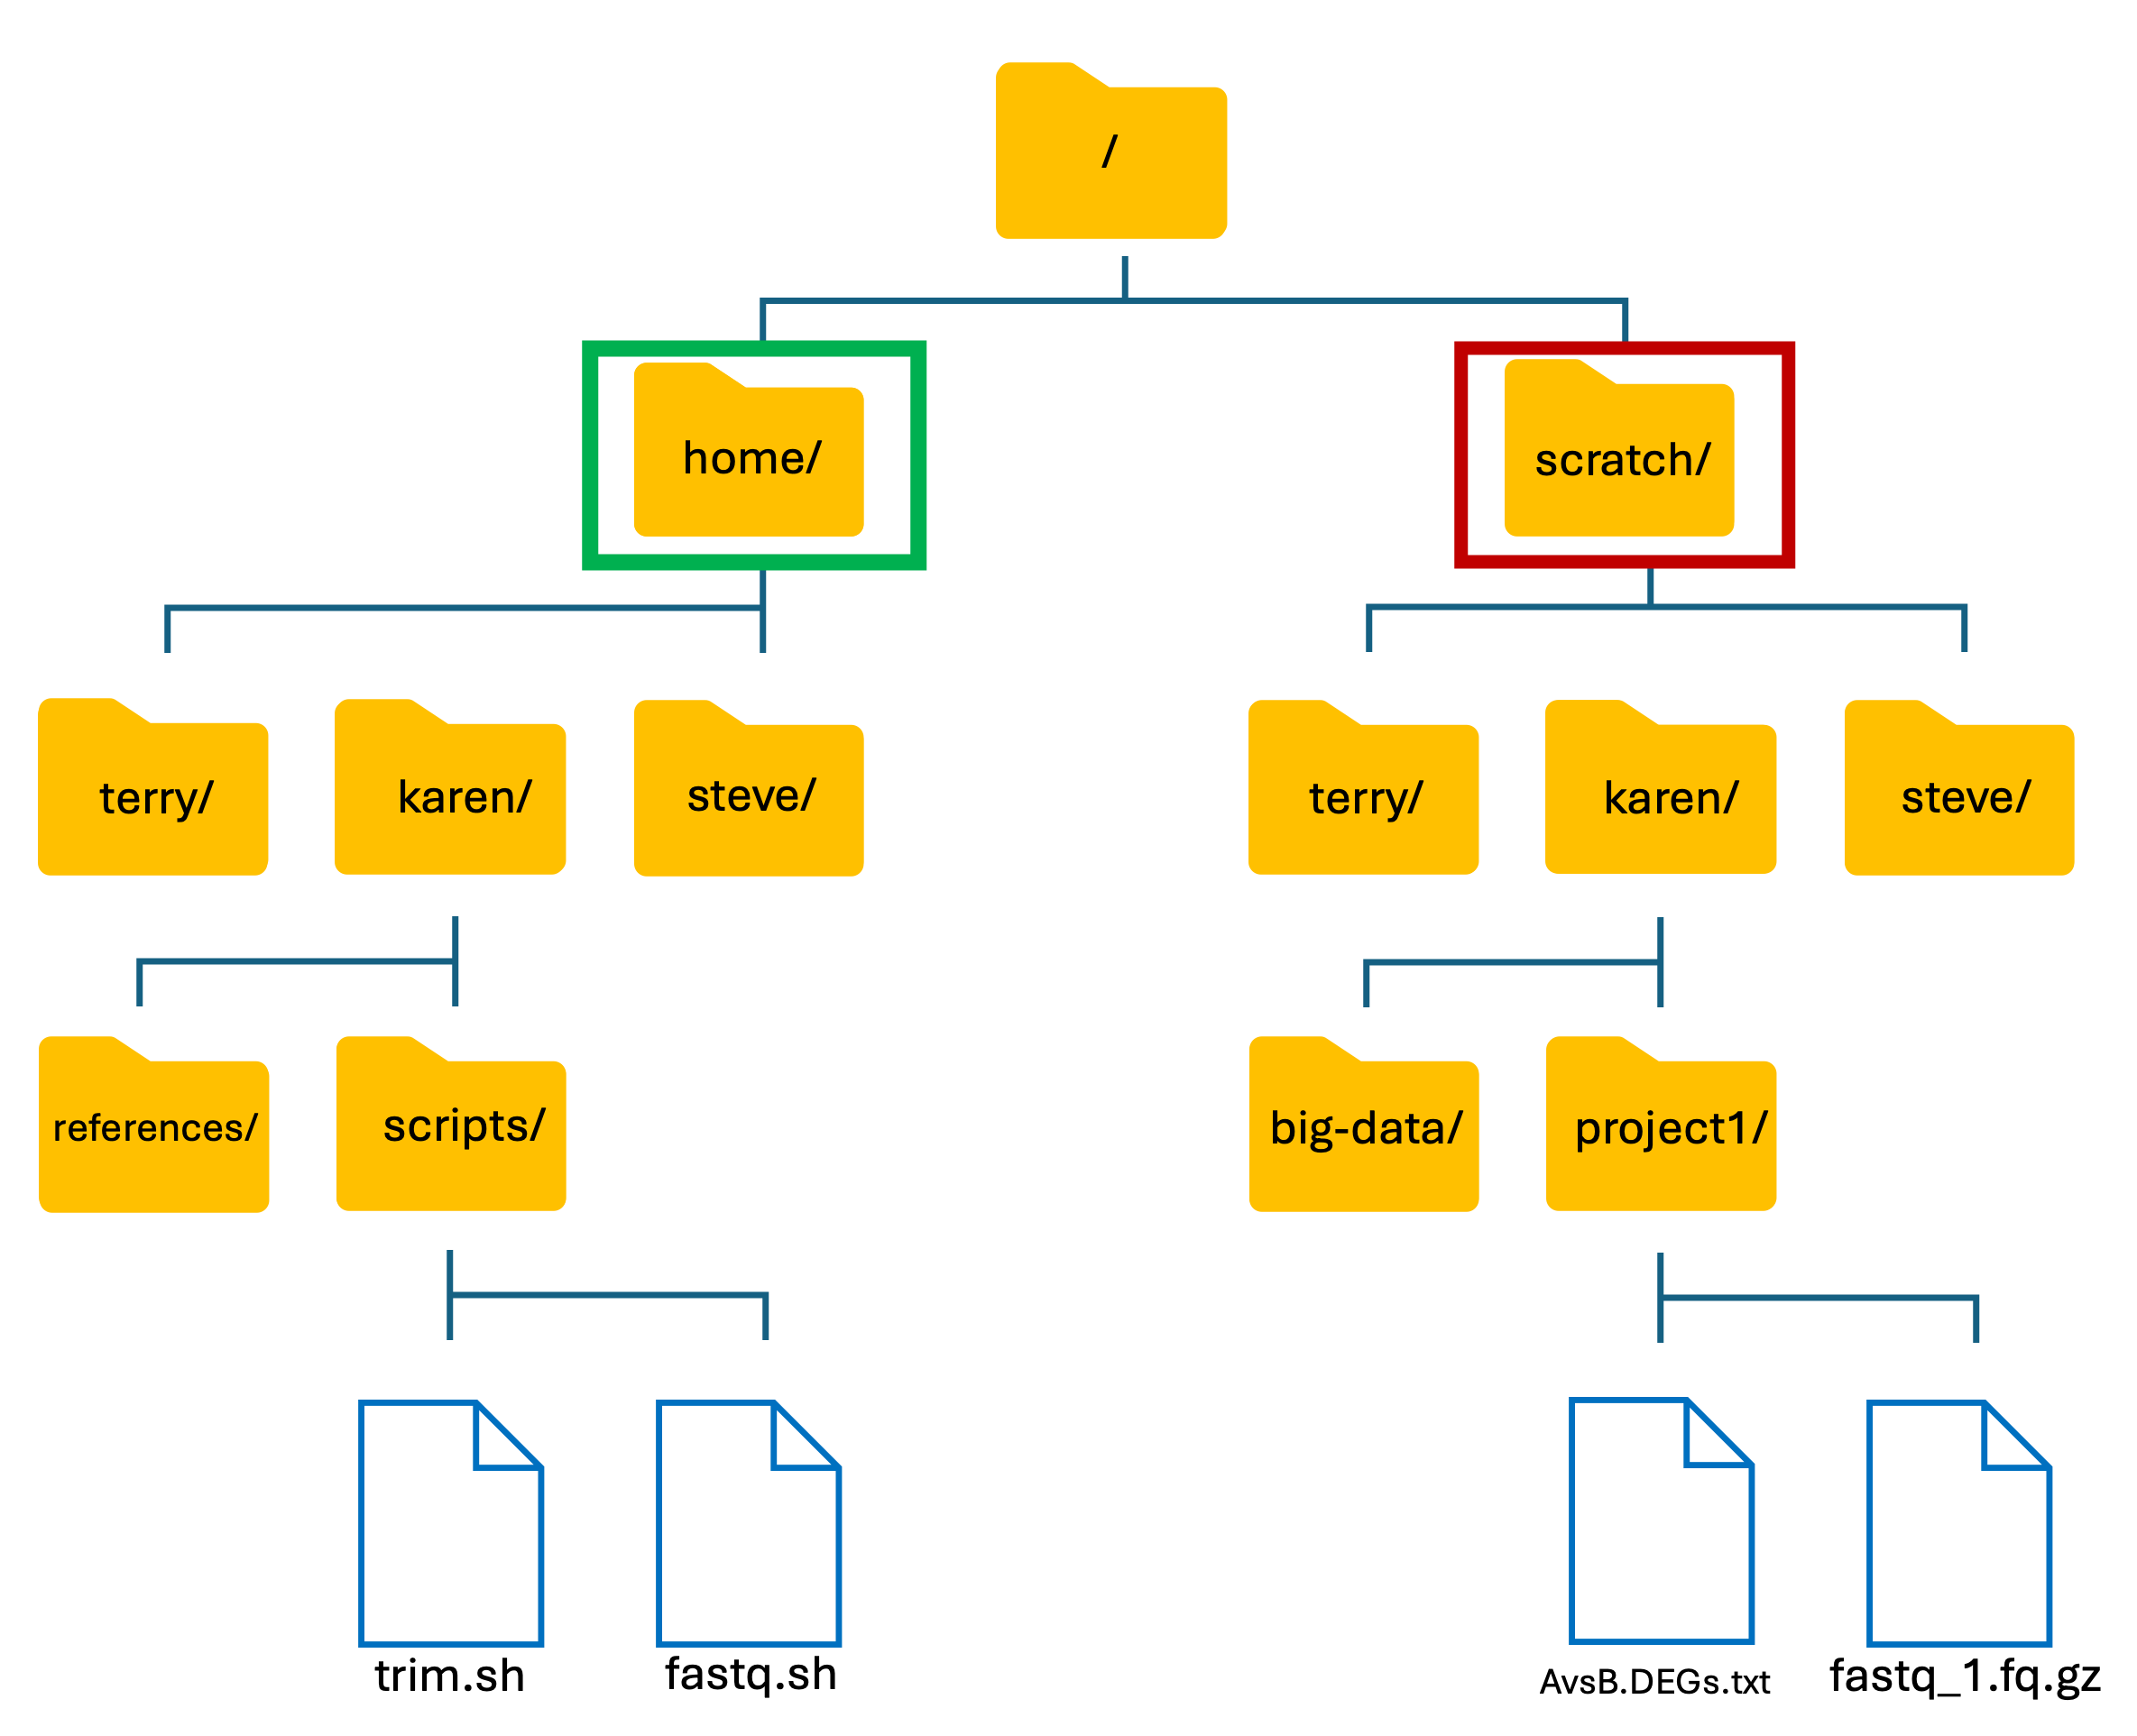
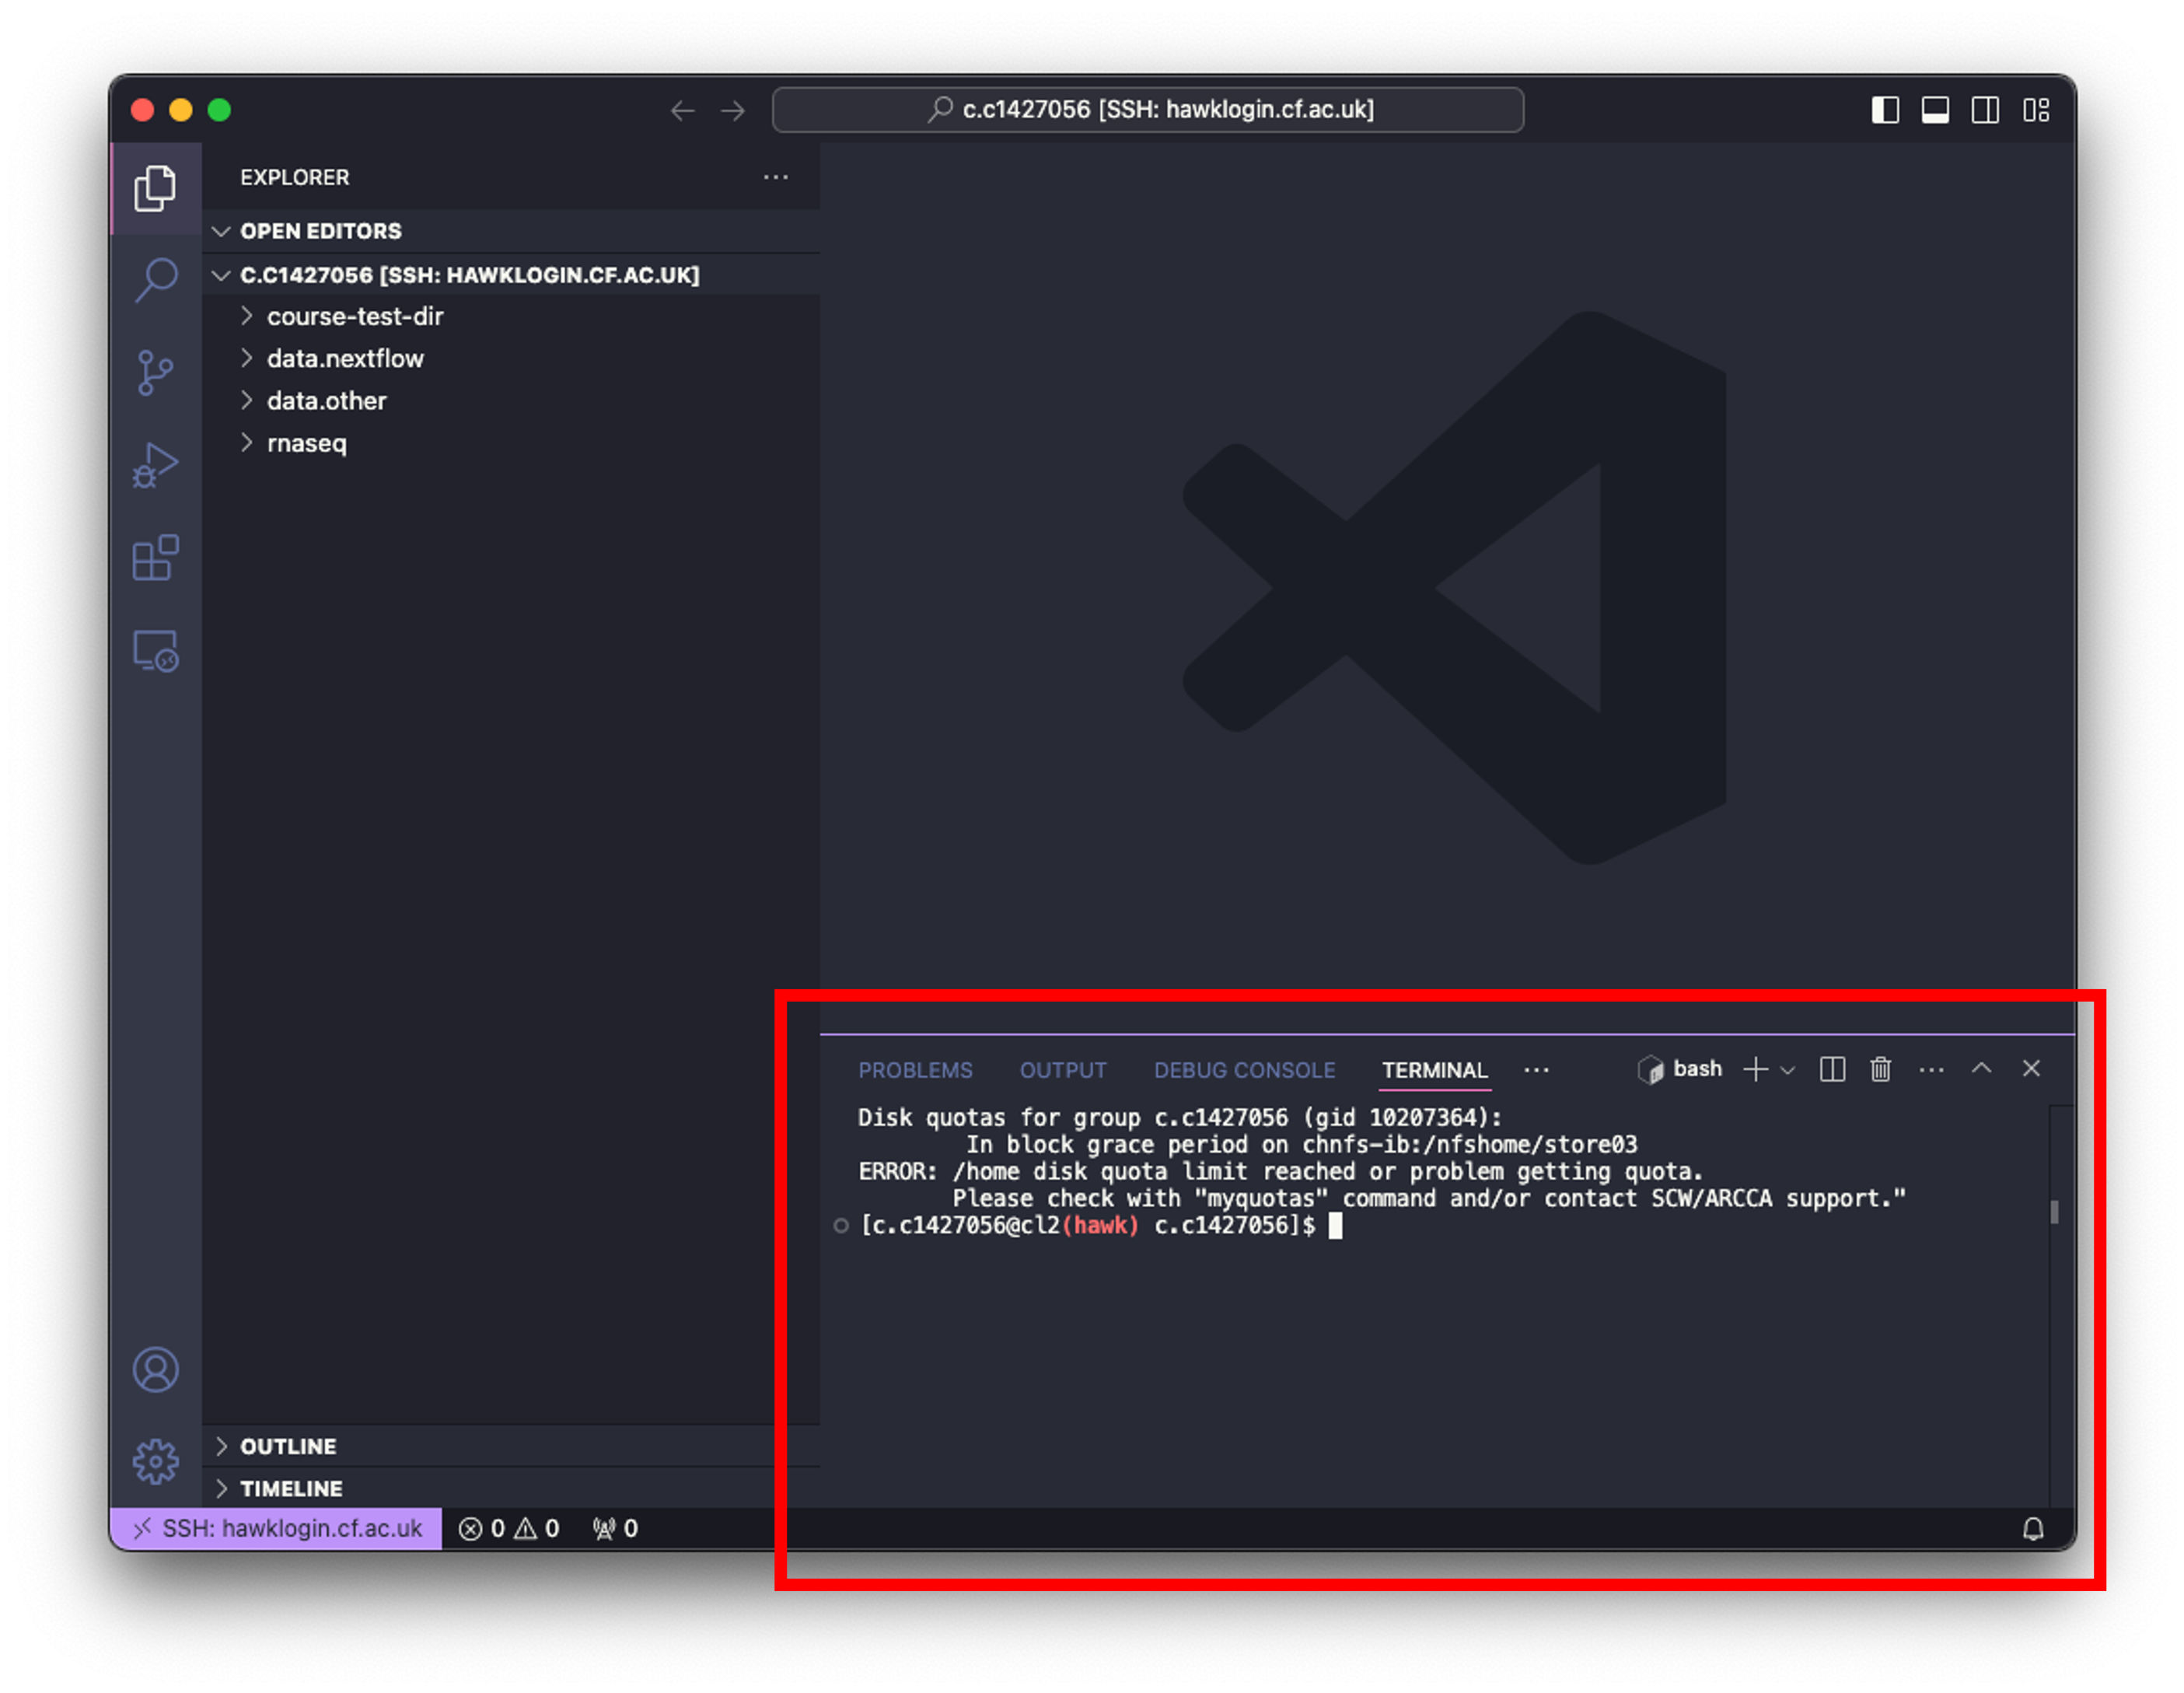
Introduction to HAWK: HAWK Filesystem
- Like our own PC’s, HAWK has its own files and folder structure.
- From here, we will now refer to folders as directories.
- The basic structure of HAWK:
-
We have two main directories: home and scratch.
- home directory
- This is where we are located when we log into HAWK.
- Has limited long-term storage.
- DO NOT WORK HERE!
- scratch directory
- This is where we perform our compute-heavy analyses.
- Not for long-term storage! Files are deleted after 60-days.
- Do your work, then move your files back to home directory or to another storage location such as the Research Data Store (RDS).
Basic Unix Continued: Common Commands
-
Now that we have covered basic Unix and introduced HAWK, we can now learn how to use the command line.
-
Here is a list of commonly used Unix commands that we will be using:
| Command | Description | Common Options | Option Description |
|---|---|---|---|
ls |
print directory contents | ls -lah |
list that is long, shows hidden files, and is human-readable |
mv |
rename/move a file | mv -r/* |
moves recursively (moves a directory and everything inside)/moves everything |
cp |
copy a file | cp -r/* |
copies recursively (copies a directory and everything inside)/copies everything |
cd |
change directory | ||
pwd |
where am I? | ||
history |
what have I typed? | ||
rm |
remove a file | rm -r/* |
removes recursively (removes a directory and everything inside)/removes everything |
mkdir |
make a directory | ||
touch |
make an empty file | ||
nano |
open and edit a file | ||
more/less |
reads a file | ||
head |
read the top of a file | ||
tail |
read the bottom of a file | ||
wc |
count the number of lines in a file | ||
grep |
word search in a file | ||
chmod |
change permission of a file | chmod +x |
makes file executable |
Basic Unix Continued: Command line Syntax
Syntax = Structure of statements in a computing language.
“I like computers” - pronoun, verb, noun
ls -lah . - command, options, arguments
ls= list command-lah= options for the list command.= argument for the list command
All commands are case sensitive!
Command
- The
lscommand will list/print the files and directories in your current directory.
Options
- The
-lahoptions will print a list in long format which will be human readable and show hidden files.
Argument
- The argument gives the system the required input, these are usually files or directories
- The
.argument means ‘here’ or where I currently am. We will cover this shortly.
Note: Not all commands have options, and most commands have optional options - you don’t have to use them!
Basic Unix Continued: Exploring Using Unix
- Lets cover the three most basic (and used) commands:
pwd= Where am I?ls= Listcd= Change directory
Basic Unix Continued: pwd Command
- When we first open a Unix shell, we are taken to the default directory.
- If you have downloaded a shell (such as iTerm2, MobaXterm, FileZilla), this location can change depending on where you installed the software.
- To find out where we are currently located, we can use the
pwdcommand. - In the example below, the pwd output tells me that I am in my Desktop directory.
Input
pwd
Output
/Users/alexgibbs/Desktop

Basic Unix Continued: ls Command
- To explore the directory, we can use the
lscommand to list the contents of the Desktop directory:
Input
ls
Output
IGV_2.8.10.app plan-to-take-over-the-world Why is multiple t-testing a problem?.pdf

- To see this list in a long format, we can use the
-loption. - To see hidden contents, we can use the
-aoption. - To see the contents in a human-readable format, we can use the
-hoption. - In the example below, we combine both options to return a long, hidden, and human-readable list of contents:
Input
ls -lah
Output
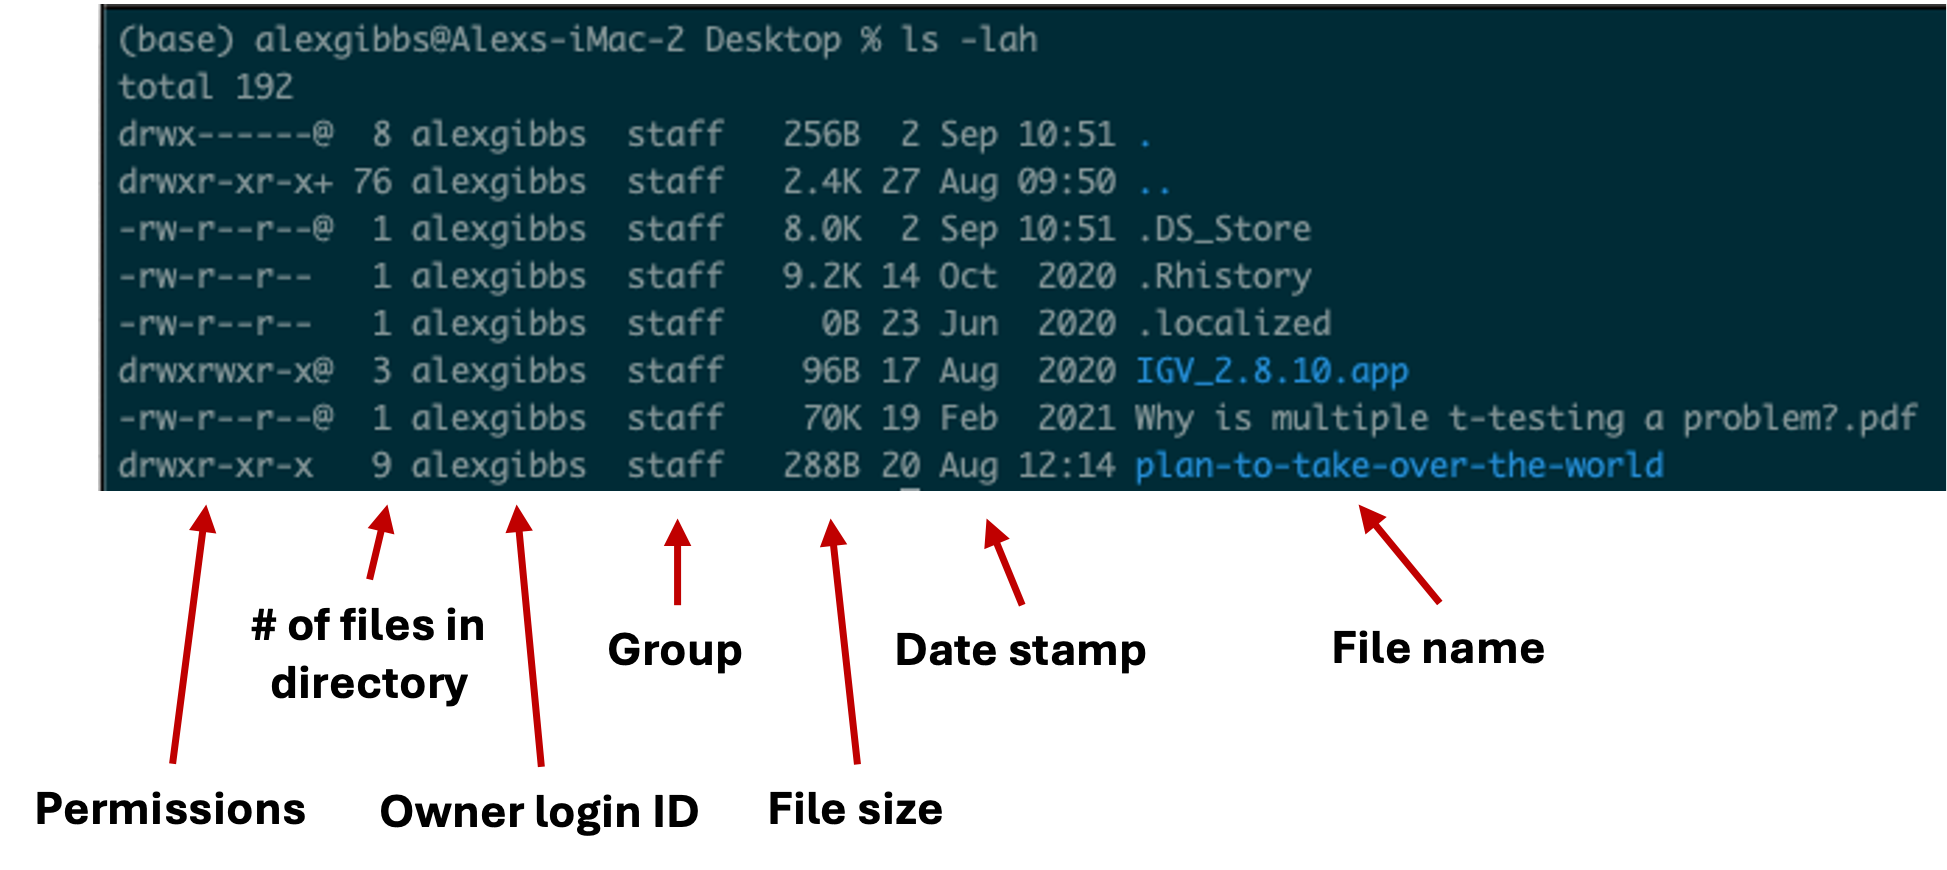
- We will cover permissions shortly
- Any file or directory with a dot (.) in front makes it hidden.
- Hidden files are usually filesystem files and directories required by the system to correctly operate and function.
- These hidden files are not normally needed by the user.
- In this course, we will potentially need to access a hidden file if things go wrong.
Basic Unix Continued: cd Command
- To move between different directories, we use the
cdcommand. - In the example below, we move into the plan-to-take-over-the-world directory.
- Note: we can use the
tab-keyto autofill. Start typing the name of the directory and then hit tab. - Note: when we use the
cdcommand, we don’t get any feedback from the shell. Usually, we move into the directory, then use thelscommand to show us the contents.
Input
cd plan-to-take-over-the-world
ls
Output
gantt-chart.pdf  top-secret-map.pdf
hit-list.docx  villain-cape-designs.ppt
how-to-attach-lasers-to-sharks.docx  world-takeover-ticklist.pdf
script-to-steal-all-the-money-in-the-UK.sh
Basic Unix Continued: Other Notations
Tab-key
- As mentioned above, we can use the
tab-keyto autofill. - This will save you time and lots of errors! The
tab-keyis your friend!
Making Use Of The Dot(.)
- As mentioned above, the dot(.) is used to tell the system where you currently are.
- This is best used for commands such as
lsandcd. - When we combine two dots(..), this tells the system to use the directory above where we currently are.
| Input | Description |
|---|---|
| . | Here/where I am now |
| .. | Previous directory/up one directory |
-For example, if I am currently in the Desktop directory and want to list contents of where I currently am, I can either use ls or ls .
Input
ls
ls .
Output
- Both give me the same output.
- If I wanted to see what contents were above/outside of my Desktop, I would use
ls ..
Input
ls ..
Output

Wildcard (*)
- The wildcard (*) can be used to select multiple things at once.
- It is used to match any character and is commonly used to select directories/files with common names.
- Example: if there are multiple directories (file-1 through file-10) and I wanted to move them all into one directory (dir-1), I could use the common name to all the files followed by the wildcard.
mv file* dir-1/
- The wildcard can also be used to select the same file extensions. Example: If we wanted to move all the .fastq files to a new directory, we would use the wildcard followed by the extension.
mv *.fastq dir-1/
Input
ls
mv file* dir-1/
ls dir-1/
mv *.fastq dir-1/
ls dir-1/
Output
Basic Unix Continued: Working Example
-
To give a visual explanation of what we have covered so far, let’s use the HAWK directory structure that I have made up:
-
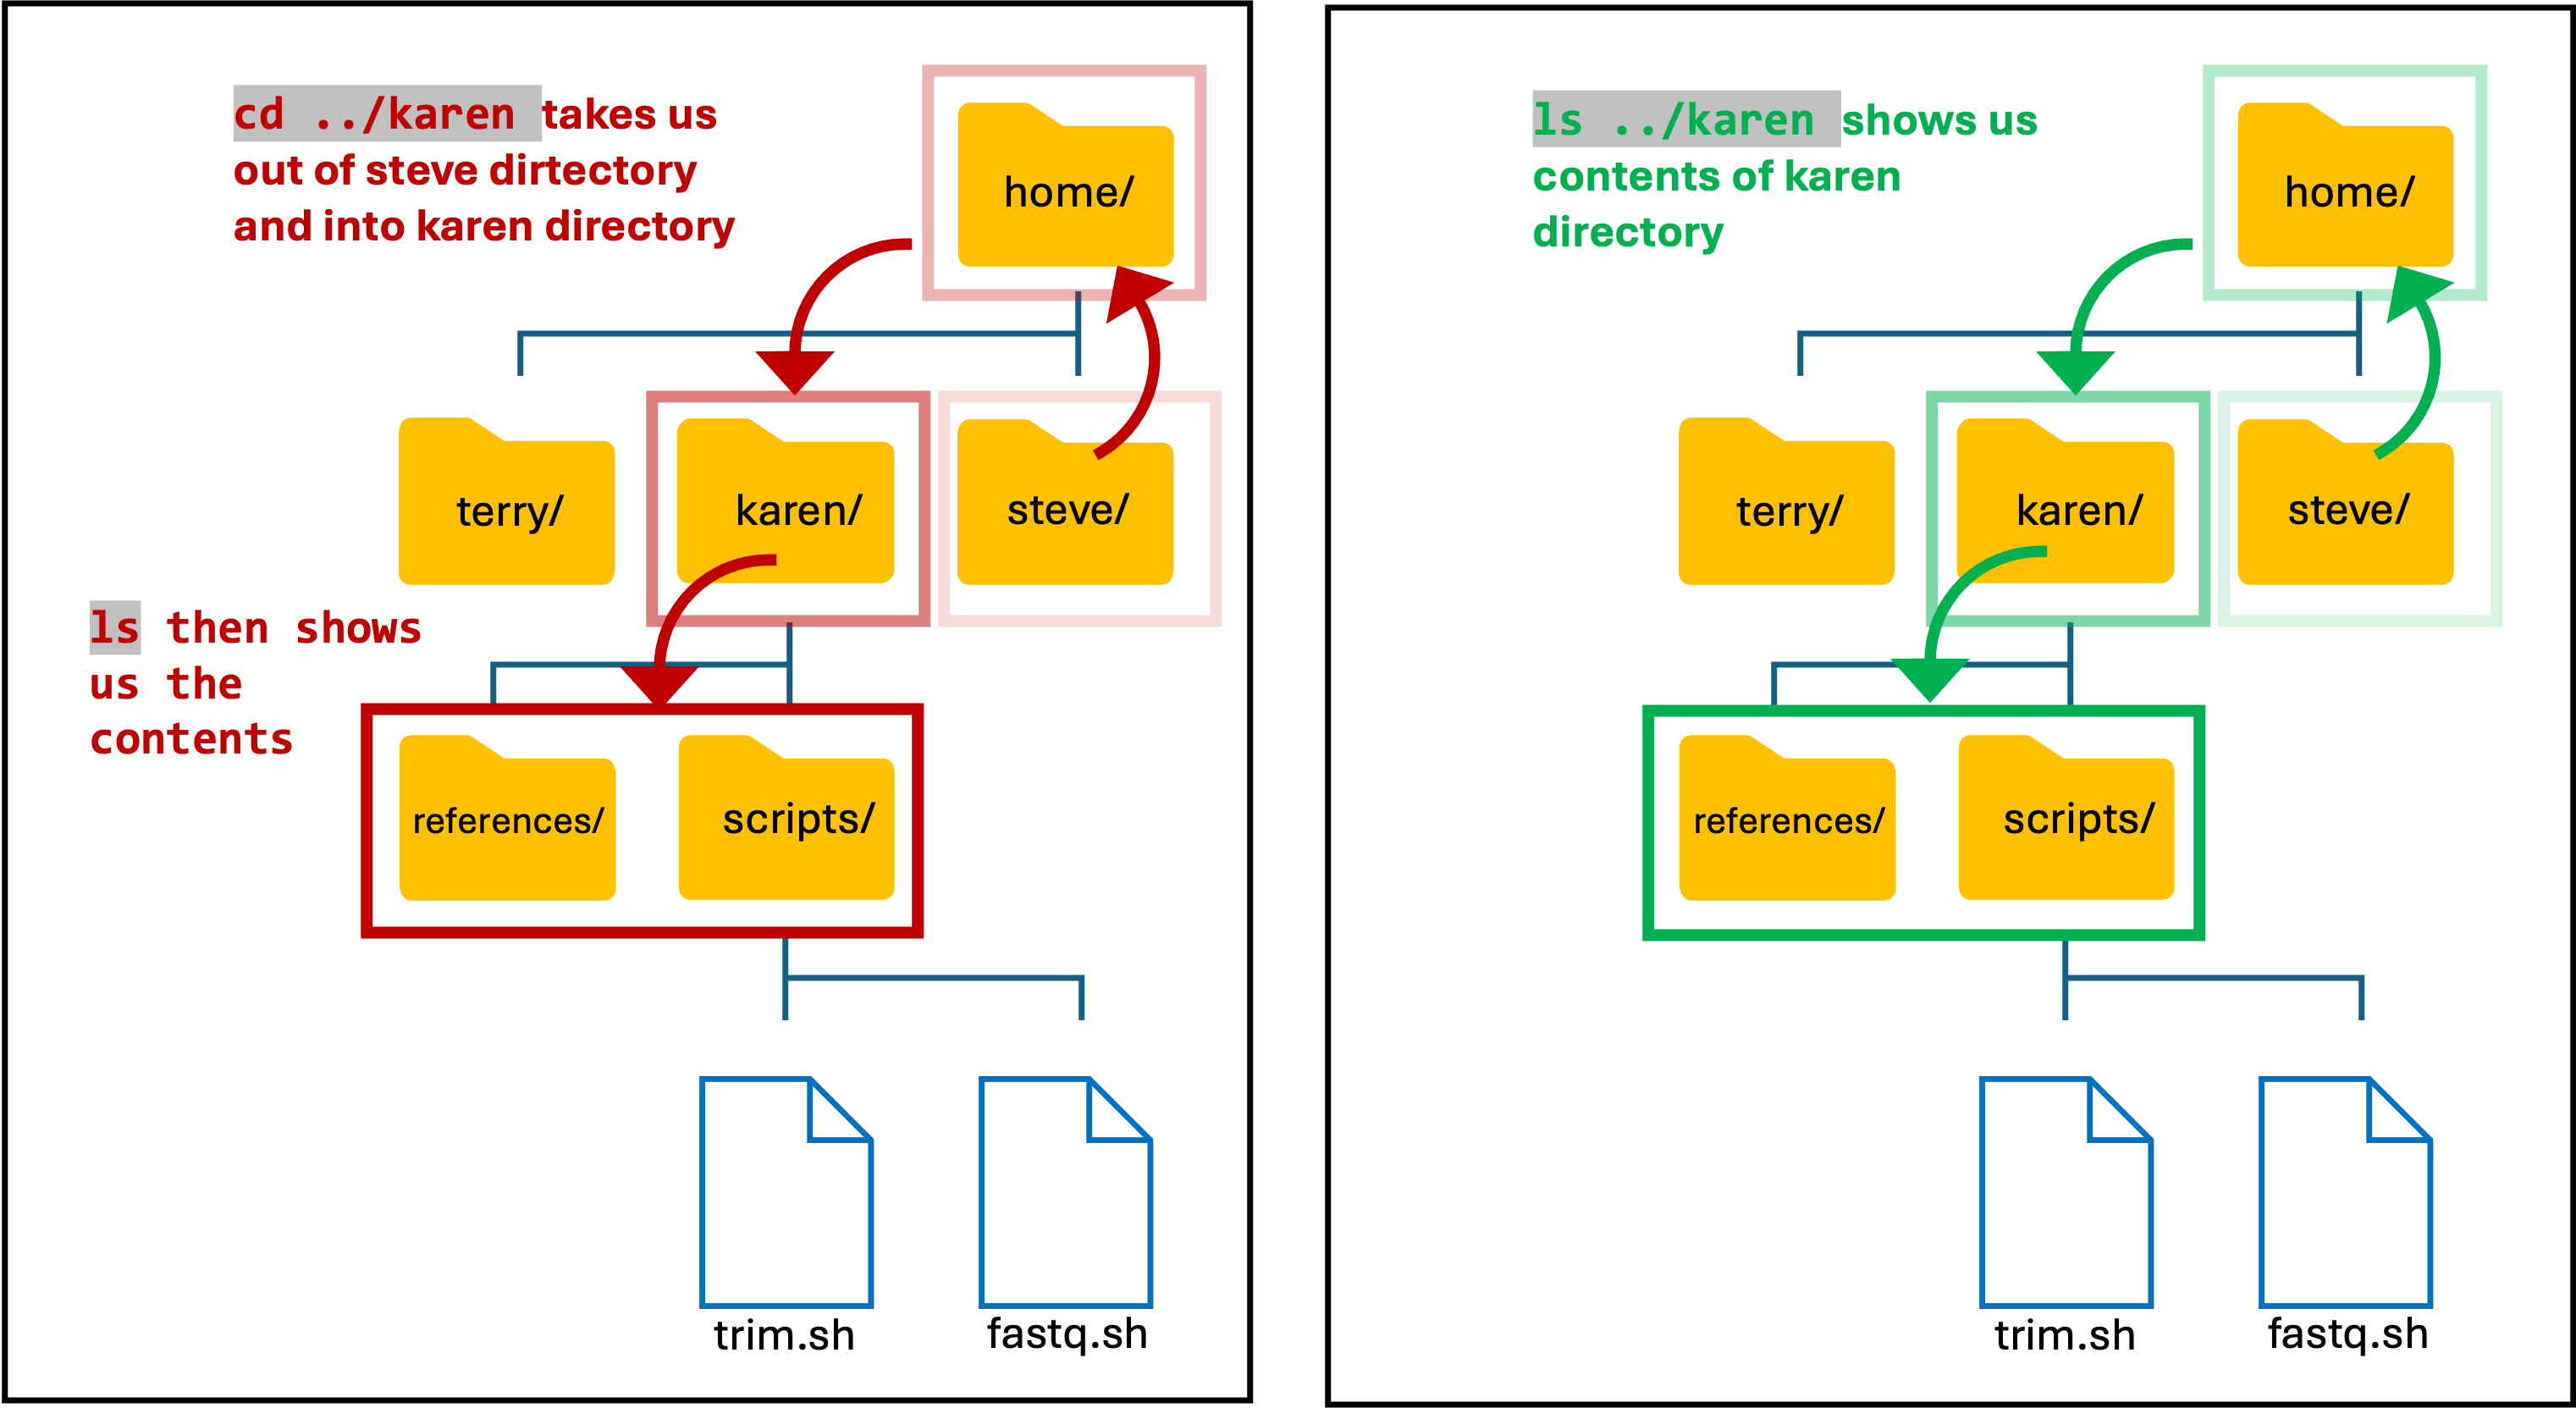
I (Steve) have just logged into my HAWK account and am not sure where I am located. To find out, I used the
pwdcommand. This tells me that I am in my personal directory within the home directory:
Input
pwd
Output
/home/steve
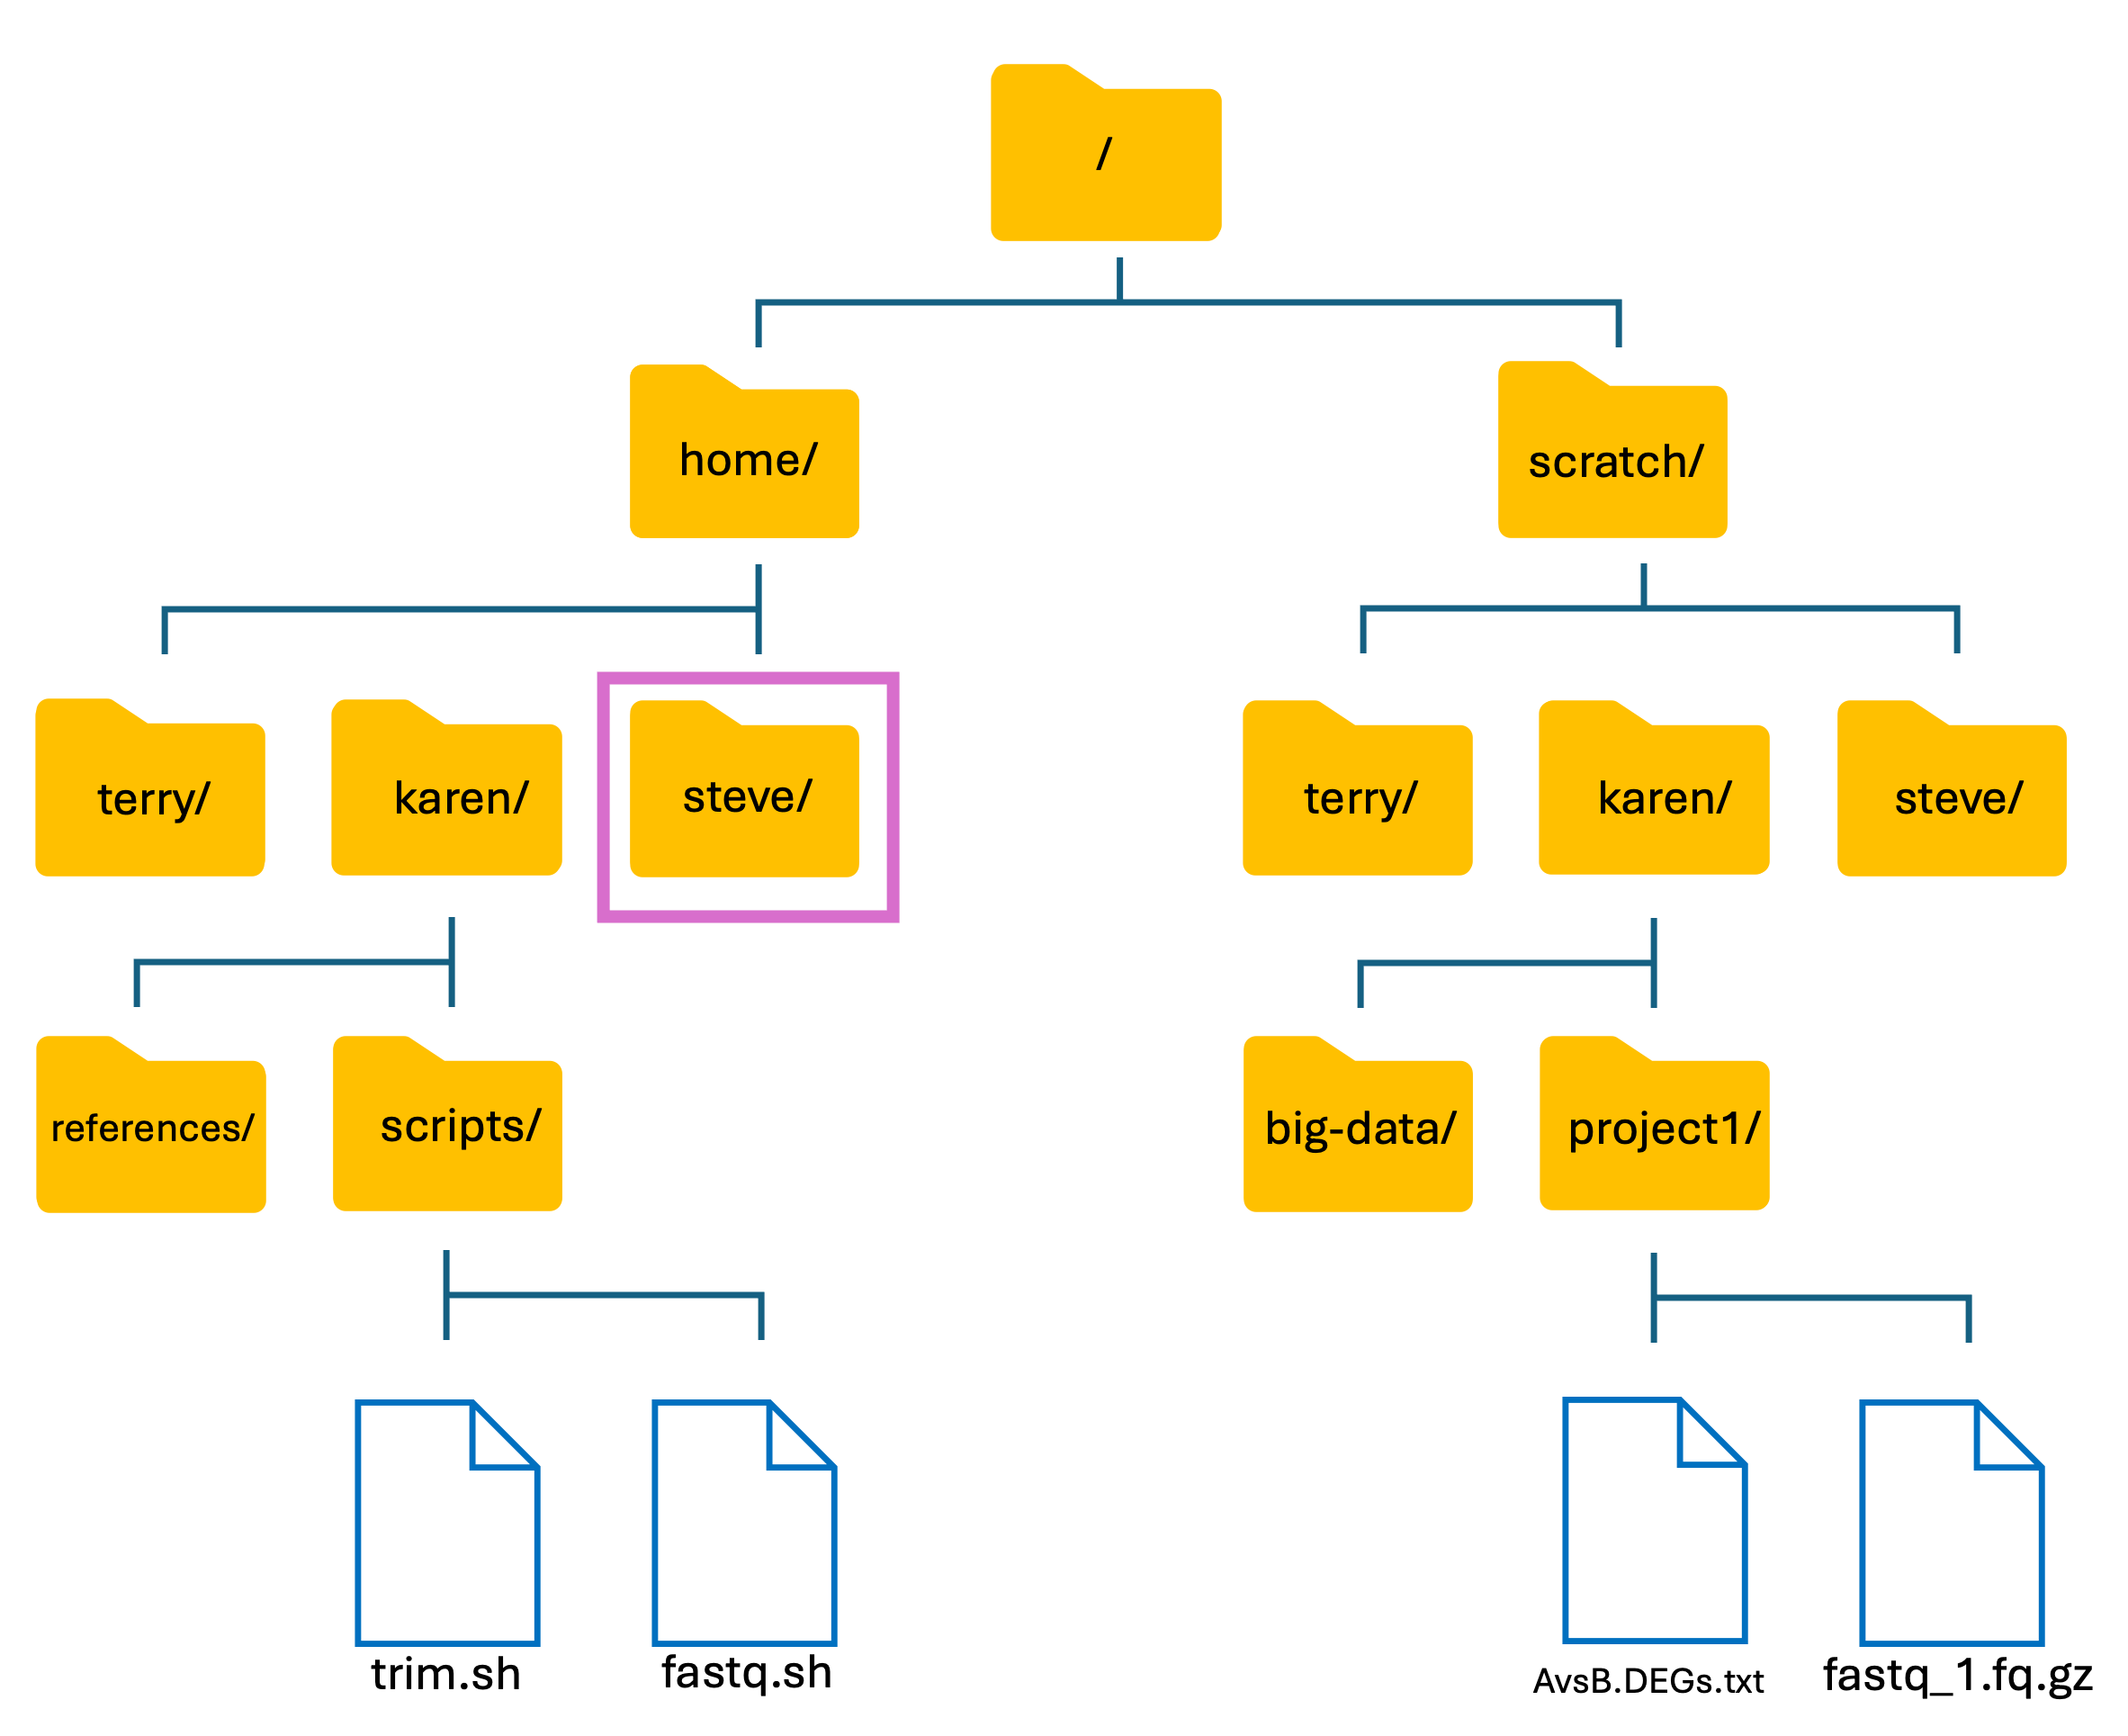
- One of the SCW administrators told me that a few users had used my account for training purposes and stored some files etc. Lets first see if the users made a directory in the home directory:
Input
ls ..
- This command lists the contents in the directory above mine, i.e. lists the contents of the home directory
Output
karen steve terry

- I decided to look at what Karen had been up to in the home directory.
- Theres two ways to do this, either move into her directory and list the contents, or use the list command.
Input
ls ../karen
OR
cd ../karen
ls
- Note: As I am still in my directory, I need to use the two dots (..) to move up/out and then into Karens directory.
Output
Basic Unix Continued: File Permissions & File Privacy
- File permissions determine who can and who can’t access certain files and directories. i.e. can you read, can you edit, and can you run/execute files?
- On HAWK, each user has their own account which comes with their own home and scratch directory.
- These directories can only be accessed by the user (and the admins). Other users can see that you have a directory, but cannot access as they do not have permission to do so.
- To see the file and directory permissions, we must first understand how the permissions are ordered.
- Unix splits file permission into three sections:
| Section | Description |
|---|---|
| user | The file/directory owner |
| group | A group of individuals permitted to read the file |
| other | Everyone |

| Symbol | Meaning |
|---|---|
| -/d | file/directory |
| u/g/o | user/group/other |
| +/- | enable/disable |
| r/w/x | read/write/execute |
- The group section enables group access to files and directories.
- When we run scripts, we need to make sure they are executable (x), otherwise the system will not recognise it as an executable file.
- To check if a file is executable, we can use the
ls -lcommand and check the permissions.
Changing File Permissions
- A good example for changing file permissions is to make a script executable.
- In the example below, I have made a shell script named
file-permission.sh - These types of files (.sh) are what we use to run a script on Unix. These scripts can range from a simple one liner task, to a list of tasks that will run sequentially.
- When we create a file using the
touchornanocommand, by default it is not executable, as denoted by-rw-r--r--. We will covernanoshortly. - Subsequently, the system does not recognise it as an executable file and you wont be able to run it.
- To change the file permissions and make the file executable, we use the
chmodcommand. - If we wanted to change the permission for just the user (u), we would use
chmod u+x. - Using
chmod +xon the file makes the file executable (x) for everyone (u/g/o).
Input
touch file-permission.sh
ls -l
chmod +x file-permission.sh
ls -l
Basic Unix Continued: Moving & Copying Files
- We sometimes will want to copy or move files from one directory to another.
- An example of this would be copying a reference genome from our home directory (long term storage) to our scratch directory for an analysis.
Basic Unix Continued: Copying a file using cp command
- The copy command does what it says on the tin… Copies a file/directory from one place to another.
Input
cp name-of-file.txt path/to/directory/
- The command works by first inputting the name of the file/directory that you want to copy, followed by the location of where you want to copy it to.
- To copy a directory, we need to use the
-roption, which recursively copies the directory and all of its contents to the desired location:
Input
cp -r name-of-directory path/to/directory/
- To state the obvious, this command makes a copy of the file at the destination that you have chosen.
Basic Unix Continued: Moving a file using mv command
- The move command does what it says on the tin… Moves a file/directory from one place to another.
Input
mv name-of-file.txt path/to/directory/
mv name-of-directory path/to/directory/

- The command works by first inputting the name of the file/directory that you want to move, followed by the location of where you want to move it to.
- Note: This command physically moves the file/directory to the location you have chosen. Be aware of typos when using this command, as it is very easy to overwrite other files/directories!
- I would recommend sticking to using the cp command when you want to move files just in case you make typos
- The
mvcommand can also be used to rename a file/directory:
Input
mv name-of-file.txt new-name-of-file.txt
mv name-of-directory new-name-of-directory

Basic Unix Continued: Making a file
- To make a file, we can use the
touchcommand. - We don’t need to use this command for the course, but for completeness (and for the task ahead) we will cover it.
Input
touch name-of-file.extension.name

- The command works by calling the
touchcommand followed by the name and extension of the file you want to create. - To make a file named
myFile.txt, we would usetouch myFile.txt.
Basic Unix Continued: Editing a file
- To edit a file in Unix, we can use an editor called nano.
- The nano editor opens a new window within the Unix shell whilst in use, and then returns you to where you was once you have exited the editor.
- To use the editor, we simply use the
nanocommand. - The editor can be used to create new files and also edit existing files.
- If we wanted to create a new file, we would use
nano name-of-new-file.extension.name. - Likewise, if we wanted to edit an existing file, we would use
nano name-of-existing-file-extension.name. - To exit the nano editor, use
ctrl + x, thenyto save, thenenterto exit.
Input
nano myFile.txt
this is some simple text that I want to put into the file.
this another simple line of text to include.
ctrl + x
y
enter
- Along the bottom of the editor, you can see the various options that you are able to use.
- Once we use
ctrl + xyou can see the bottom of the editor changes tosave modified buffer?. TypingYsaves the file,Ndeletes it. - Once you have hit
Y, you get another prompt to check the file name. Here, you get the opportunity to rename the file if needed. Then hittingentersaves and exits the editor.
Basic Unix Continued: Making a directory
- To make a directory, we can use the
mkdircommand.
Input
mkdir name-of-directory
- The command works by calling the
mkdircommand followed by the name of the directory you want to make. - We can use this command to make multiple directories within the current directory, too:
Input
mkdir directory1 directory2 directory3
- Each new directory is named after the other and is separated by a space whilst using the command.
- We can also create a new directory within an existing directory without moving into it:
Input
mkdir directory1/directory1.1
- The
touchcommand can also be used in this manner.
Exercise 1
- Open VSCode, click on ‘Terminal’ at the top of your screen and select ‘New Terminal’.
- Find out where you are.
- Find where the unix-practical directory is.
- Move into the unix-practical directory and list the contents.
Answer
Find out where you are:
pwd
List contents:
ls
Change directory:
cd unix-practical
The unix-practical directory should be located within your Downloads directory (unless you have moved it)
pwd
ls /Users/c1234567/Downloads
cd unix-practical
ls
Exercise 2
- Map out the unix-practical directory.
- Are there any hidden files?
- Fix the typo in the
script.shfile and make it executable.
Answer
List the contents:
ls -lah
List contents of the each directory:
ls -lah directory-name
Use the tree function to quickly map files and directories (does not show hidden files):
tree
Use list function followed by wildcard to get multi-output:
ls -lah *
You can use multiple wildcards to list the contents further down: ls -lah */*
Use nano editor to correct the typo in script.sh:
nano script.sh
Change the permissions by using chmod: chmod +x script.sh
nf-core/fetchngs Pipeline
- nf-core is a community effort to collect a curated set of analysis pipelines that are built using Nextflow.
- The nf-core website contains >100 curated pipelines and is used by thousands of researchers and bioinformaticians across the globe.
- These pipelines are community-validated by bioinformaticians across the globe, and are standardized to ensure that they adhere to community standards such as FAIR principles.
- Nextflow is a tool that allows us to run several different tasks on HAWK.
- Each task may depend on an output from a previous task, may need to be run sequentially, or perhaps need to be run individually all at once.
- Nextflow allows us to do this, and helps organise the way these tasks are run.
Fetchngs Pipeline
- This pipeline allows us to fetch metadata and raw FastQ files from public and private databases
- The pipeline currently supports SRA/ENA/DDBJ/GEO/Synapse IDs.
- The only thing we need for this pipeline to run is a list of sample IDs.
Finding a dataset
- We first need to find a dataset. Some of you may already have found one via a paper that you have read etc.
- There are multiple repositories that we can find samples on. The two most common are Gene Expression Omnibus (GEO) and Array Express.
- For this course, we will use GEO to find our dataset.
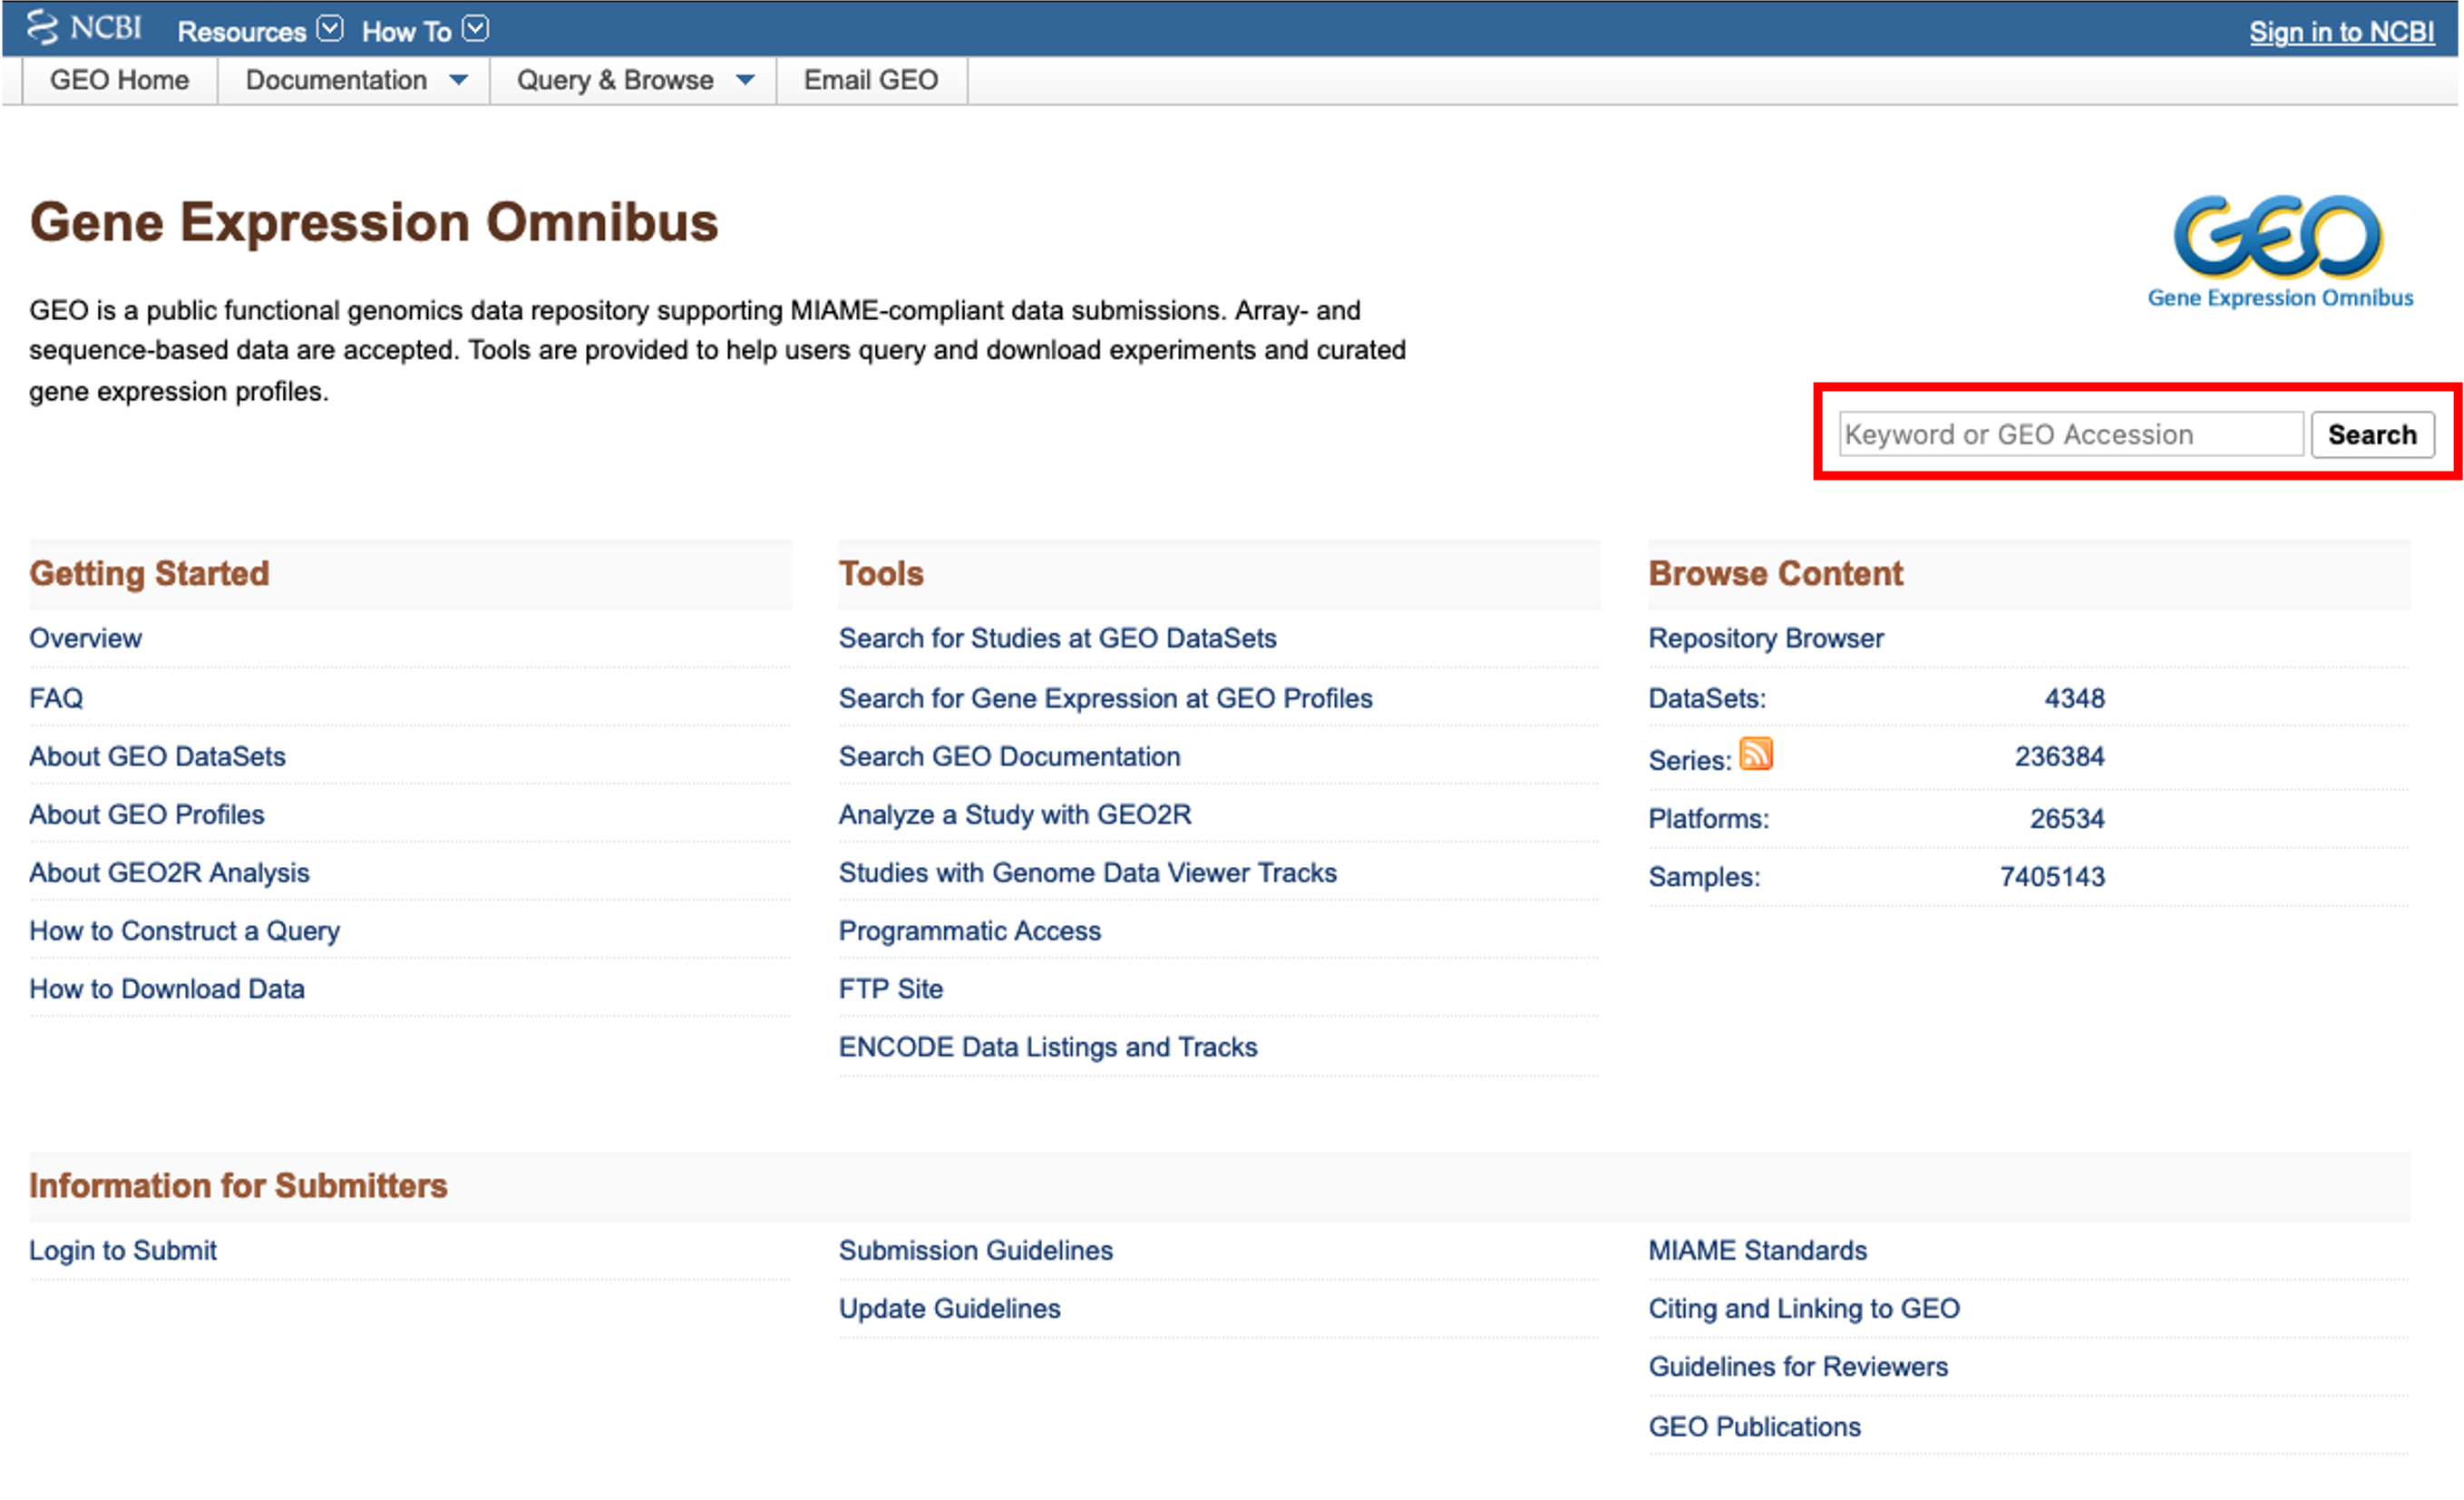
GEO
- When accessing the GEO website, we are faced with multiple links and tools.
- If we have a dataset in mind that we would like to find, we can use the search bar at the top right of the page.
- I would like to find a bulk rna seq dataset on renal cell carcinoma. To do this, I enter ‘renal cell carcinoma rna seq’ into the search bar and click ‘search’.
- A pop-up window appears telling me that there are 351 results. Clicking on the ‘351’ will load the results.

- On the results page, we are greeted with the results accompanied by further optional filters on the left and right hand side of the page.
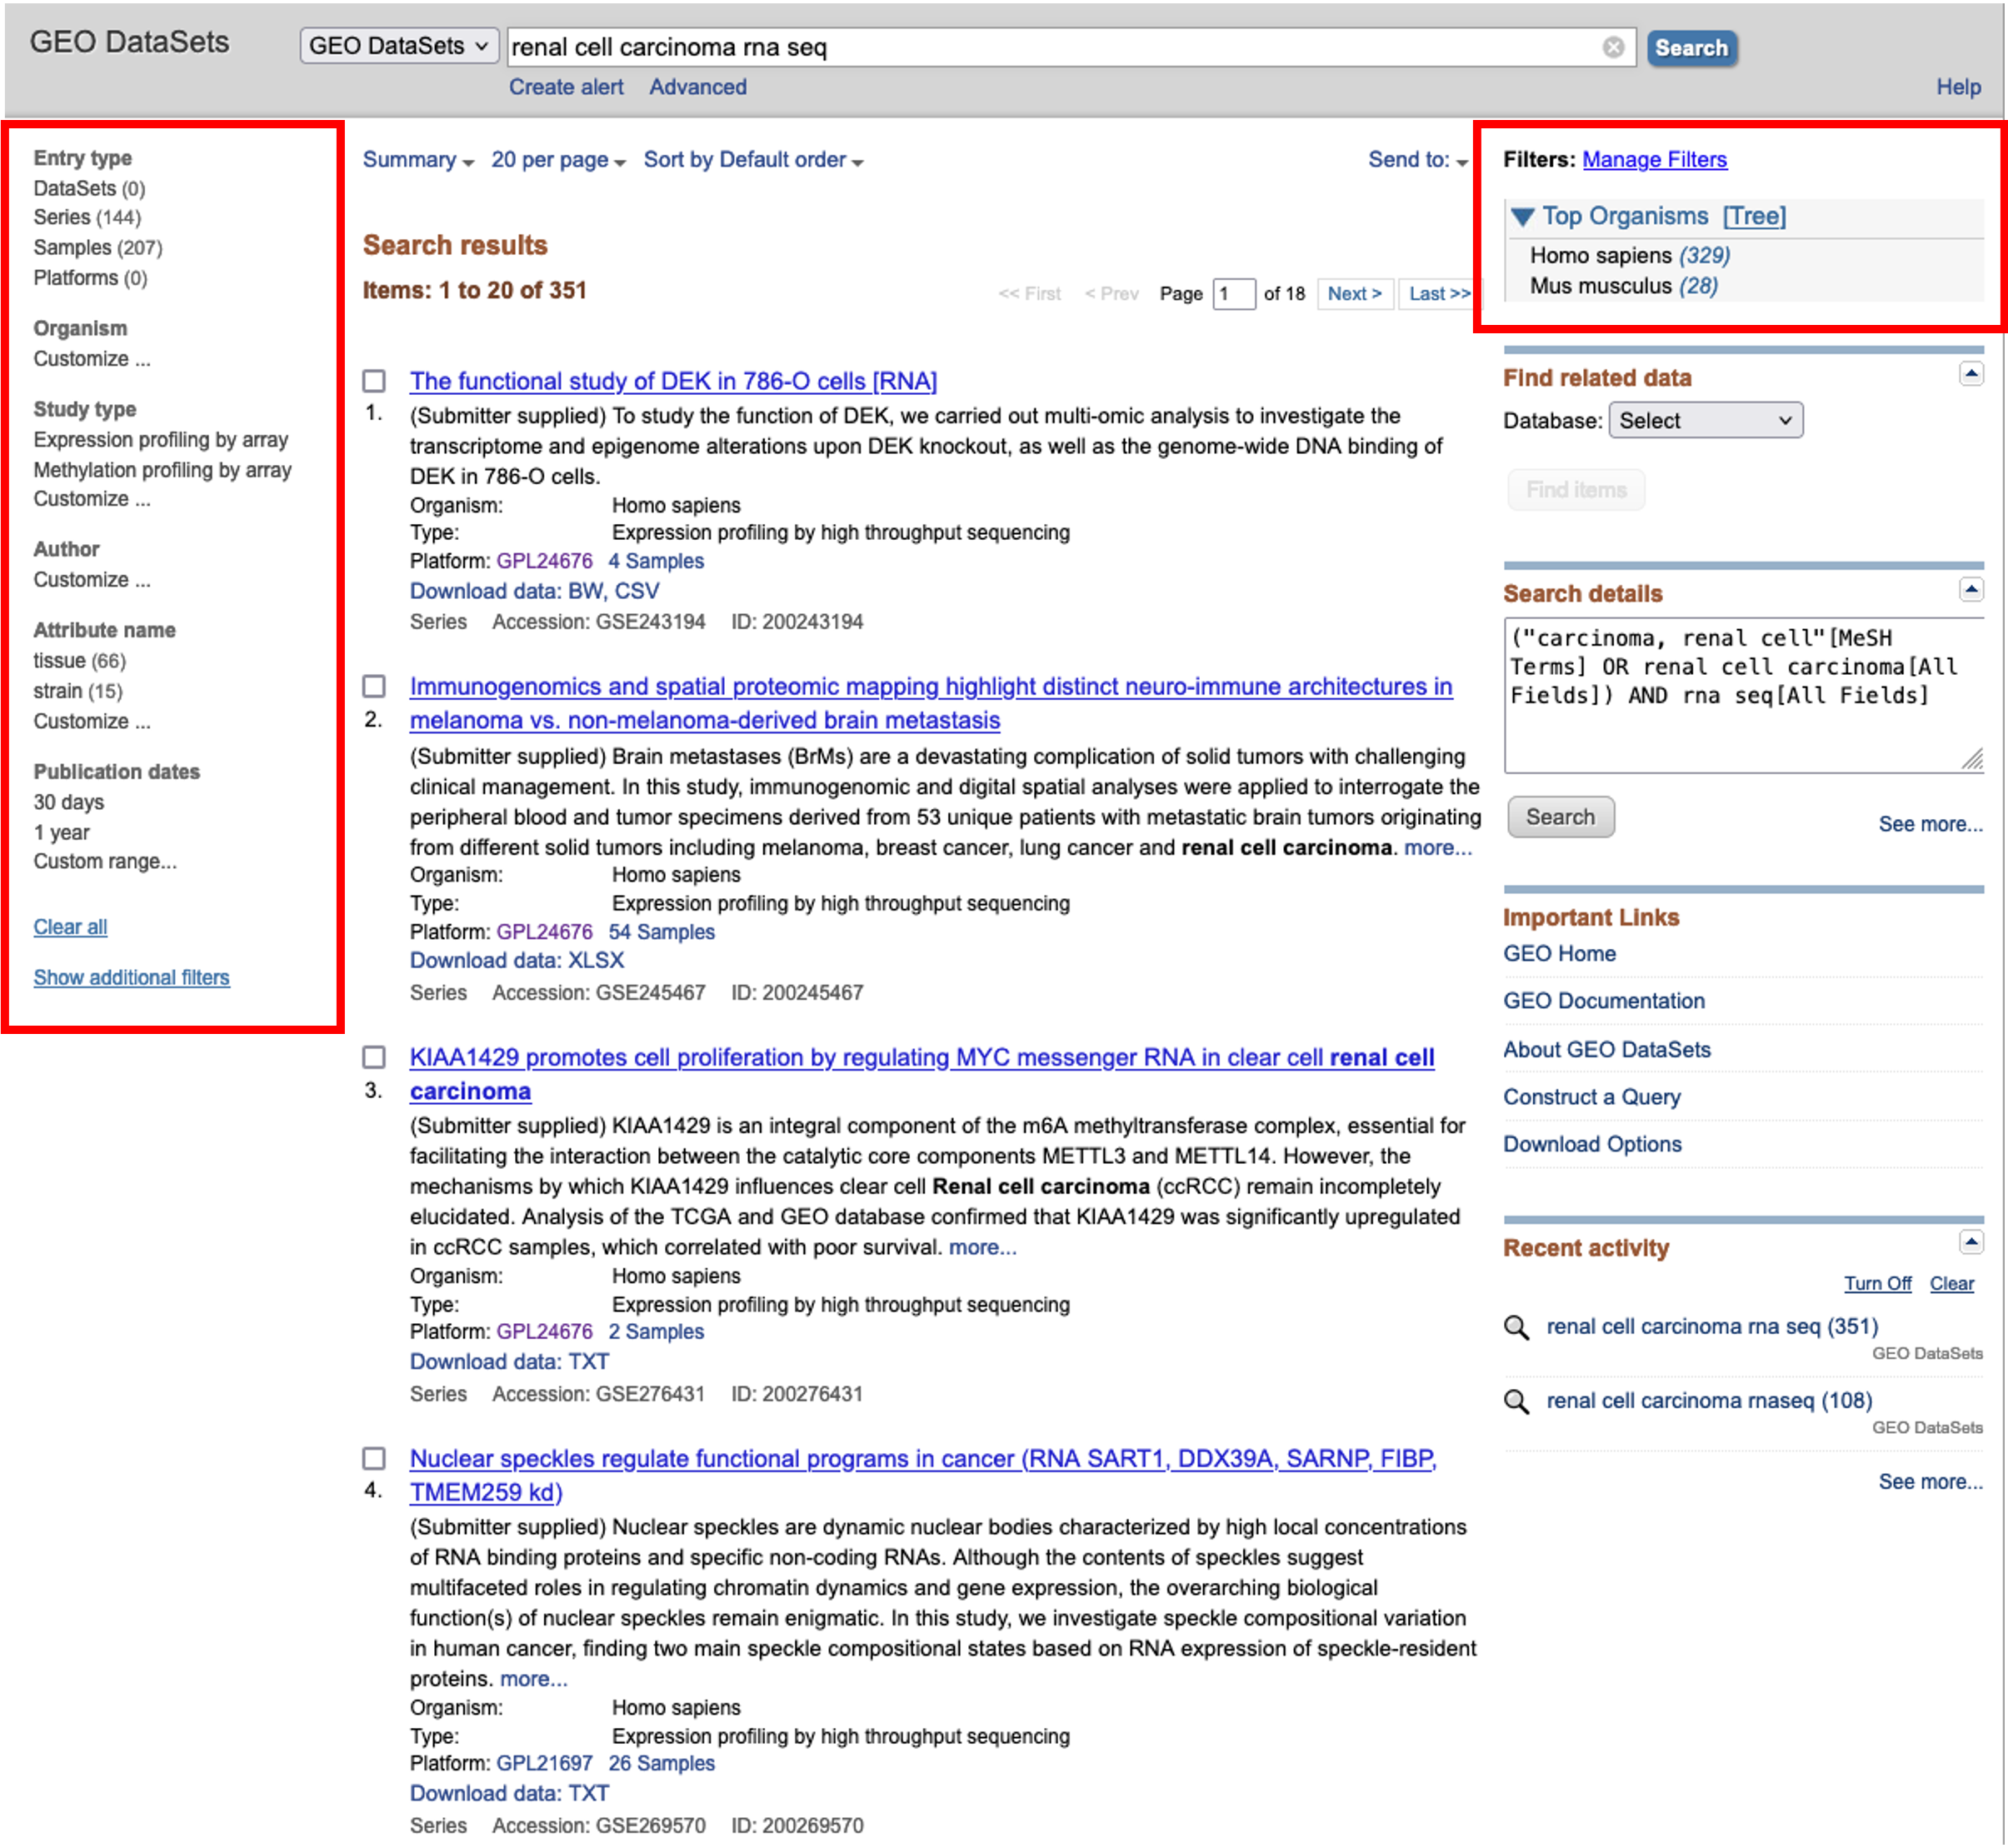
- Here, we will choose to filter for Homo sapiens using the option on the right hand side and then browse for an interesting dataset.
- For this course, I found a nice dataset looking at the effects of hypoxia on gene expression across two different cell lines.
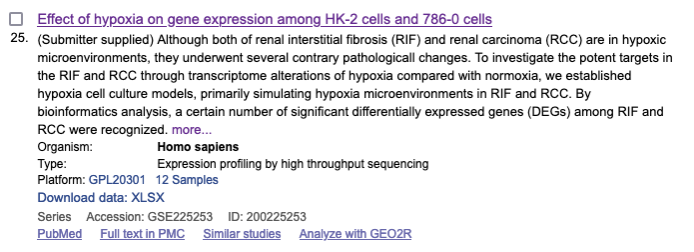
- Clicking on the dataset title will load the series record for that dataset. Can everyone follow this link and follow along.
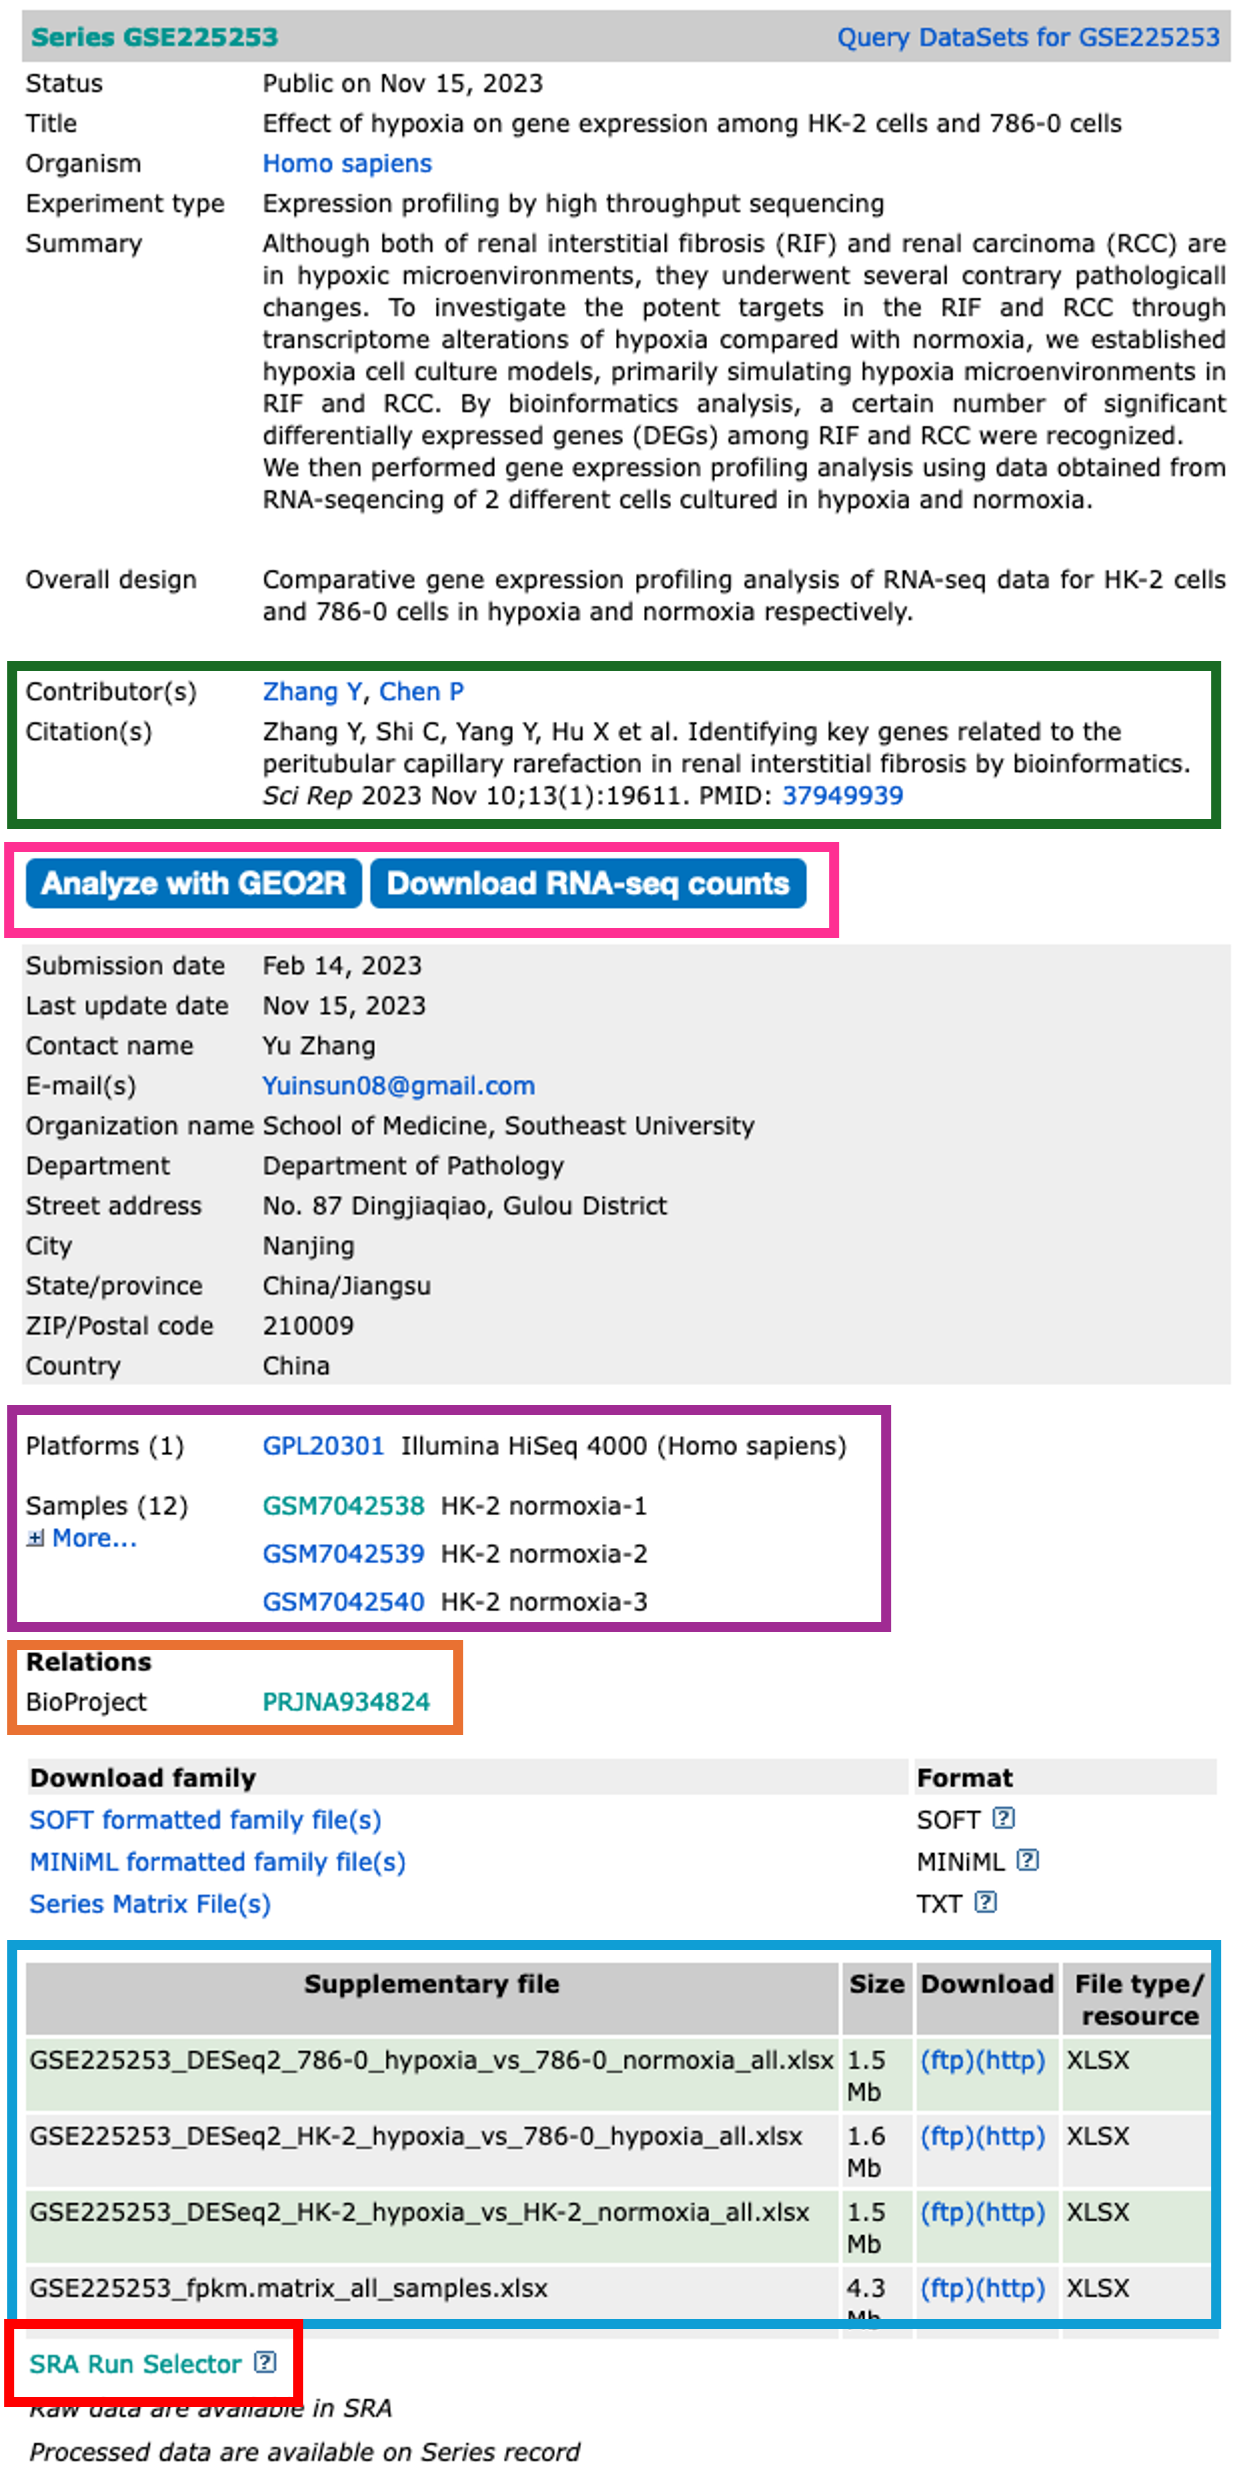
- The dataset series record page displays the all the relevant information about that dataset.
- Towards the top of the page, you will find information about the study in which the dataset was used.
Contributors and Citation
- The authors and any related publication can be found in the contributors and citations sections.
Analyze with GEO2R and Download RNA-seq counts
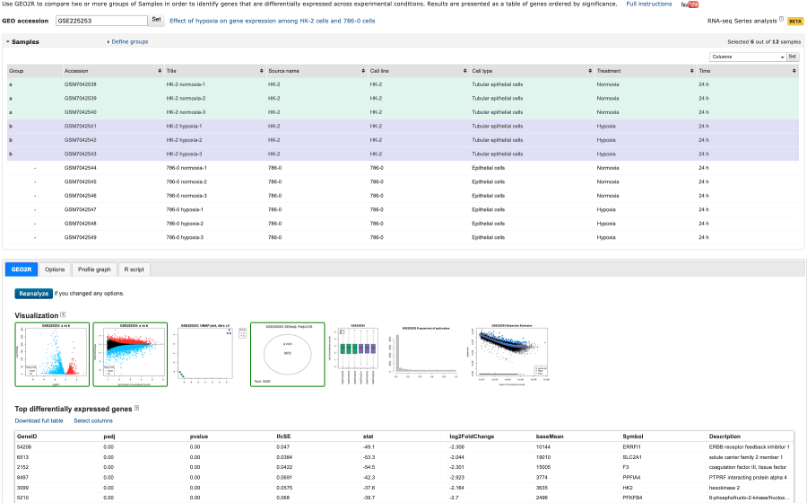
- The Analyze with GEO2R option has been on GEO for quite some time, and is a handy tool to use if you are performing the most basic of analyses.
- The tool allows you to define your own groups and can perform Differential Gene Expression (DGE) analyses rather quickly.
- It’s a great tool, but doesn’t always work on the dataset you want to analyse (depends on what data the authors have uploaded)
- It’s worth checking this tool out before continuing. We won’t be covering this tool during this course. If you would like a run through on it, please get in touch.
Analyze with GEO2R tool
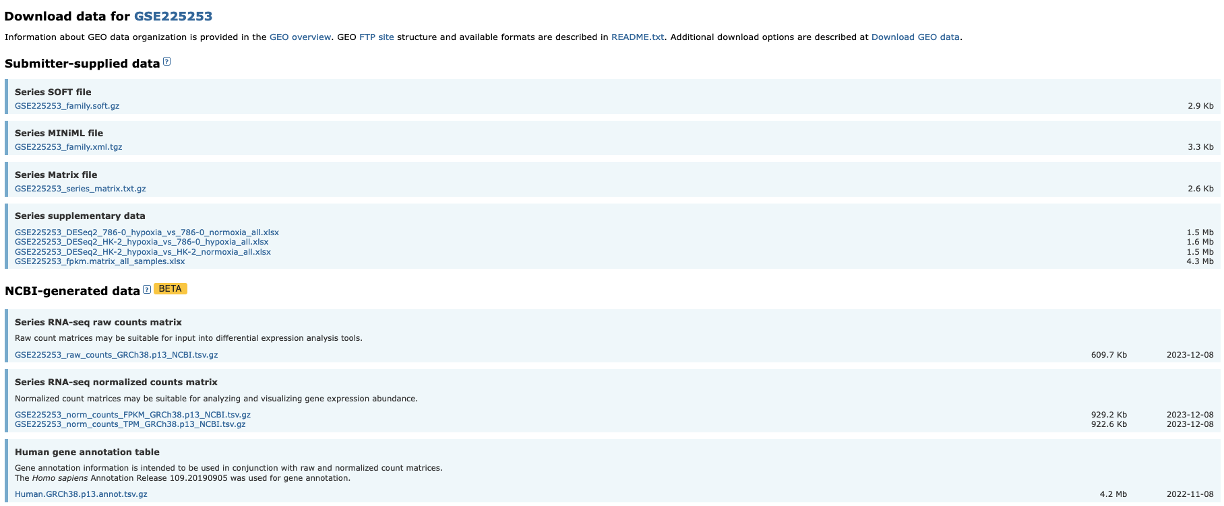
- The Download RNA-seq counts option takes you to a page which provides you with download links to all of the uploaded and NCBI-generated data.
- This is really handy as it highlights what each piece of data is.
- Again, this may not contain the raw sequencing data, but worth checking before proceeding.
Download RNA-seq counts
Platforms and Samples
- This section shows us information about the samples and what platform they were sequenced on.
BioProject
- The raw sequencing data for a dataset is stored in the Sequencing Read Archive (SRA). Once samples have been uploaded, they are given a BioProject ID.
- This BioProject ID link takes us straight to where the raw sequencing data is stored.
Supplementary files
- All the associated data is stored in this section.
- What you have here is completely down to how nice the authors are.
- For a GEO upload, the authors must upload normalised data tables in which their observations were made.
- Sometimes authors also upload Differentially Expressed Gene (DEG) tables and raw sequencing read counts.
- These authors have been so very kind to upload their DEGs, so there really is no need for us to continue on. But most authors do not upload these, so we will need to make them ourselves.
SRA Run Selector
- The SRA Run Selector link takes us directly to the SRA where we can download the sequencing data.
- Some may be asking, isn’t this the same as the BioProject ID link? Yes and no.
- The BioProject ID link takes you to an overview page, just like the GEO page we are currently on.
- The SRA Run Selector link takes us directly to the page where we can download the data.
Downloading the relevant data
- We will be downloading 6 normoxia samples, 3 from each cell line.
- To do this, we need to click on the SRA Run Selector link. 1) Once the new page has loaded, we can go ahead and use the filter tool on the top left to select 8: Treatment, then normoxia. 2) This filters the table at the bottom of the screen. We can then click the tick box at the top left of the table to select all 6 samples. 3) Once all samples are selected, we can now click on the sliding Selected tab so move it to the right. This filters the data to include only the samples we have selected. 4) Now we can click on the Accession list option. This downloads a text file called SRR_Acc_List.txt.
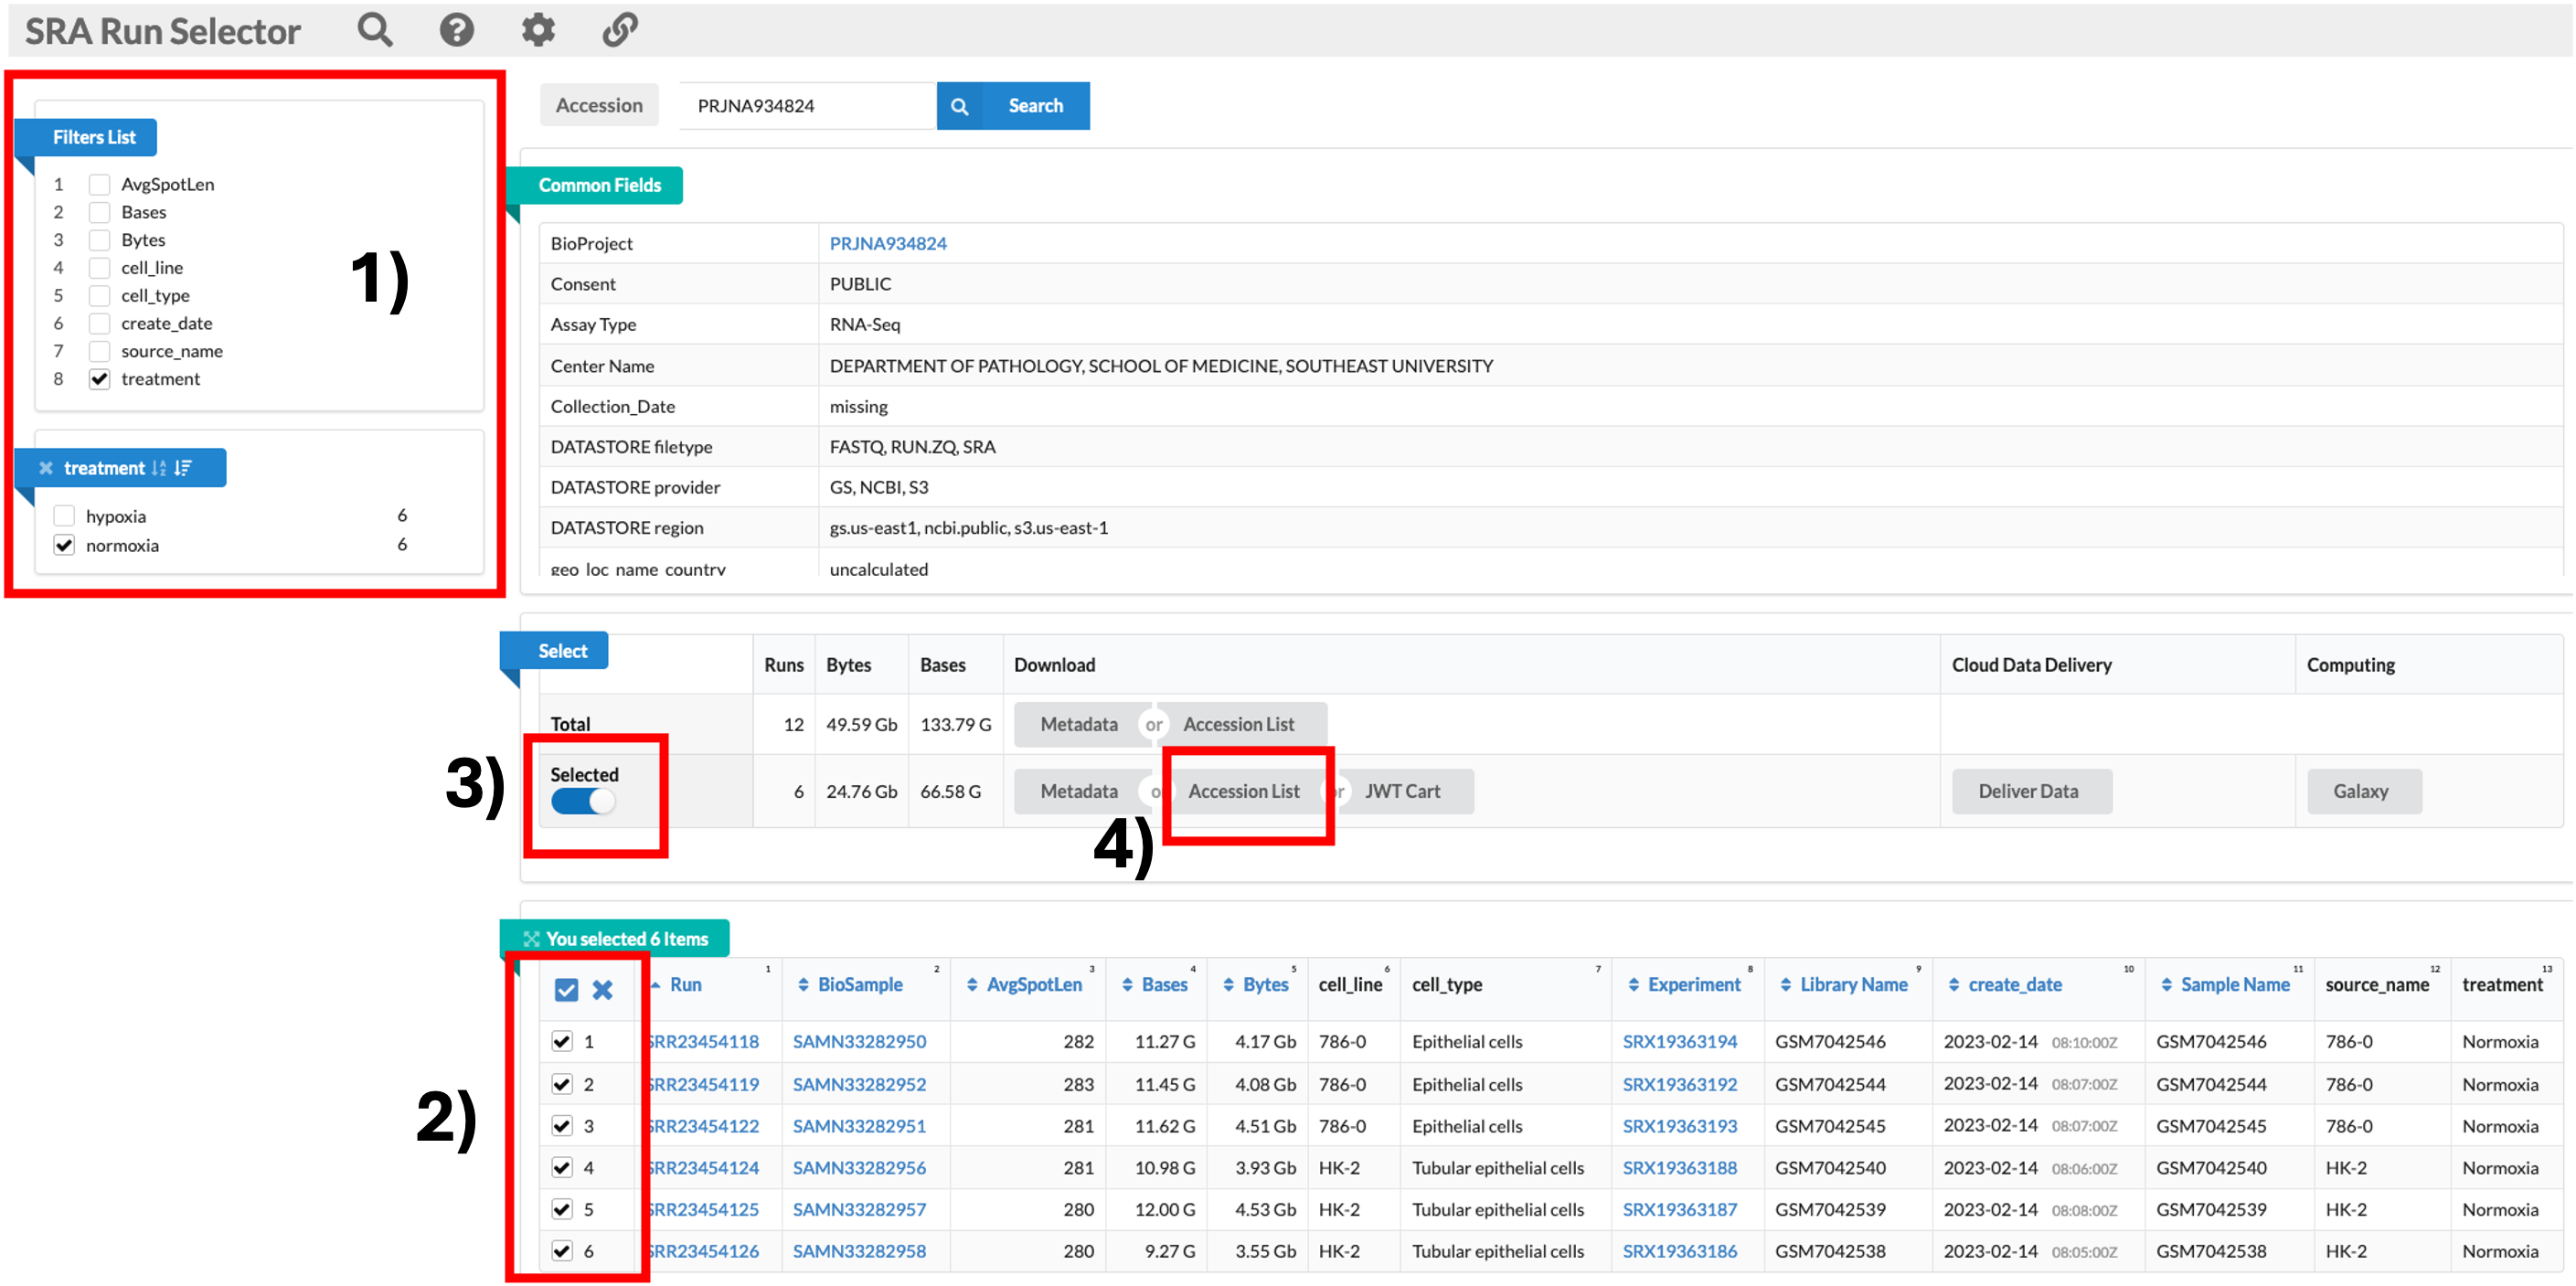
SRR_Acc_List.txt
SRR23454118
SRR23454119
SRR23454122
SRR23454124
SRR23454125
SRR23454126
nf-core/fetchngs pipeline
- To keep things as simple as possible for users, I have created a GitHub repository which contains all of the directory structures and relevant scripts to perform each task for us.
- This will hopefully make things easier for users who are not so confident with coding.
Log into HAWK
- Lets first log onto HAWK. We will be doing all of our coding within VSCode.
- If you do not have VSCode set-up, please let me know now so that we can get you up and running.
- Note: those of you using Linux may have to use code to do this. I will include the code below each section.
- Firstly, make sure you are connected to the VPN. If you are on-campus, theres no need.
- In VSCode, click on the ‘Remote Explorer’ button, then click ‘Connect to Host in New Window’ button. This opens a new VSCode window with the remote host.
- You will be prompted (top box) to enter your password. Do this and hit enter.
- You are now connected to HAWK.
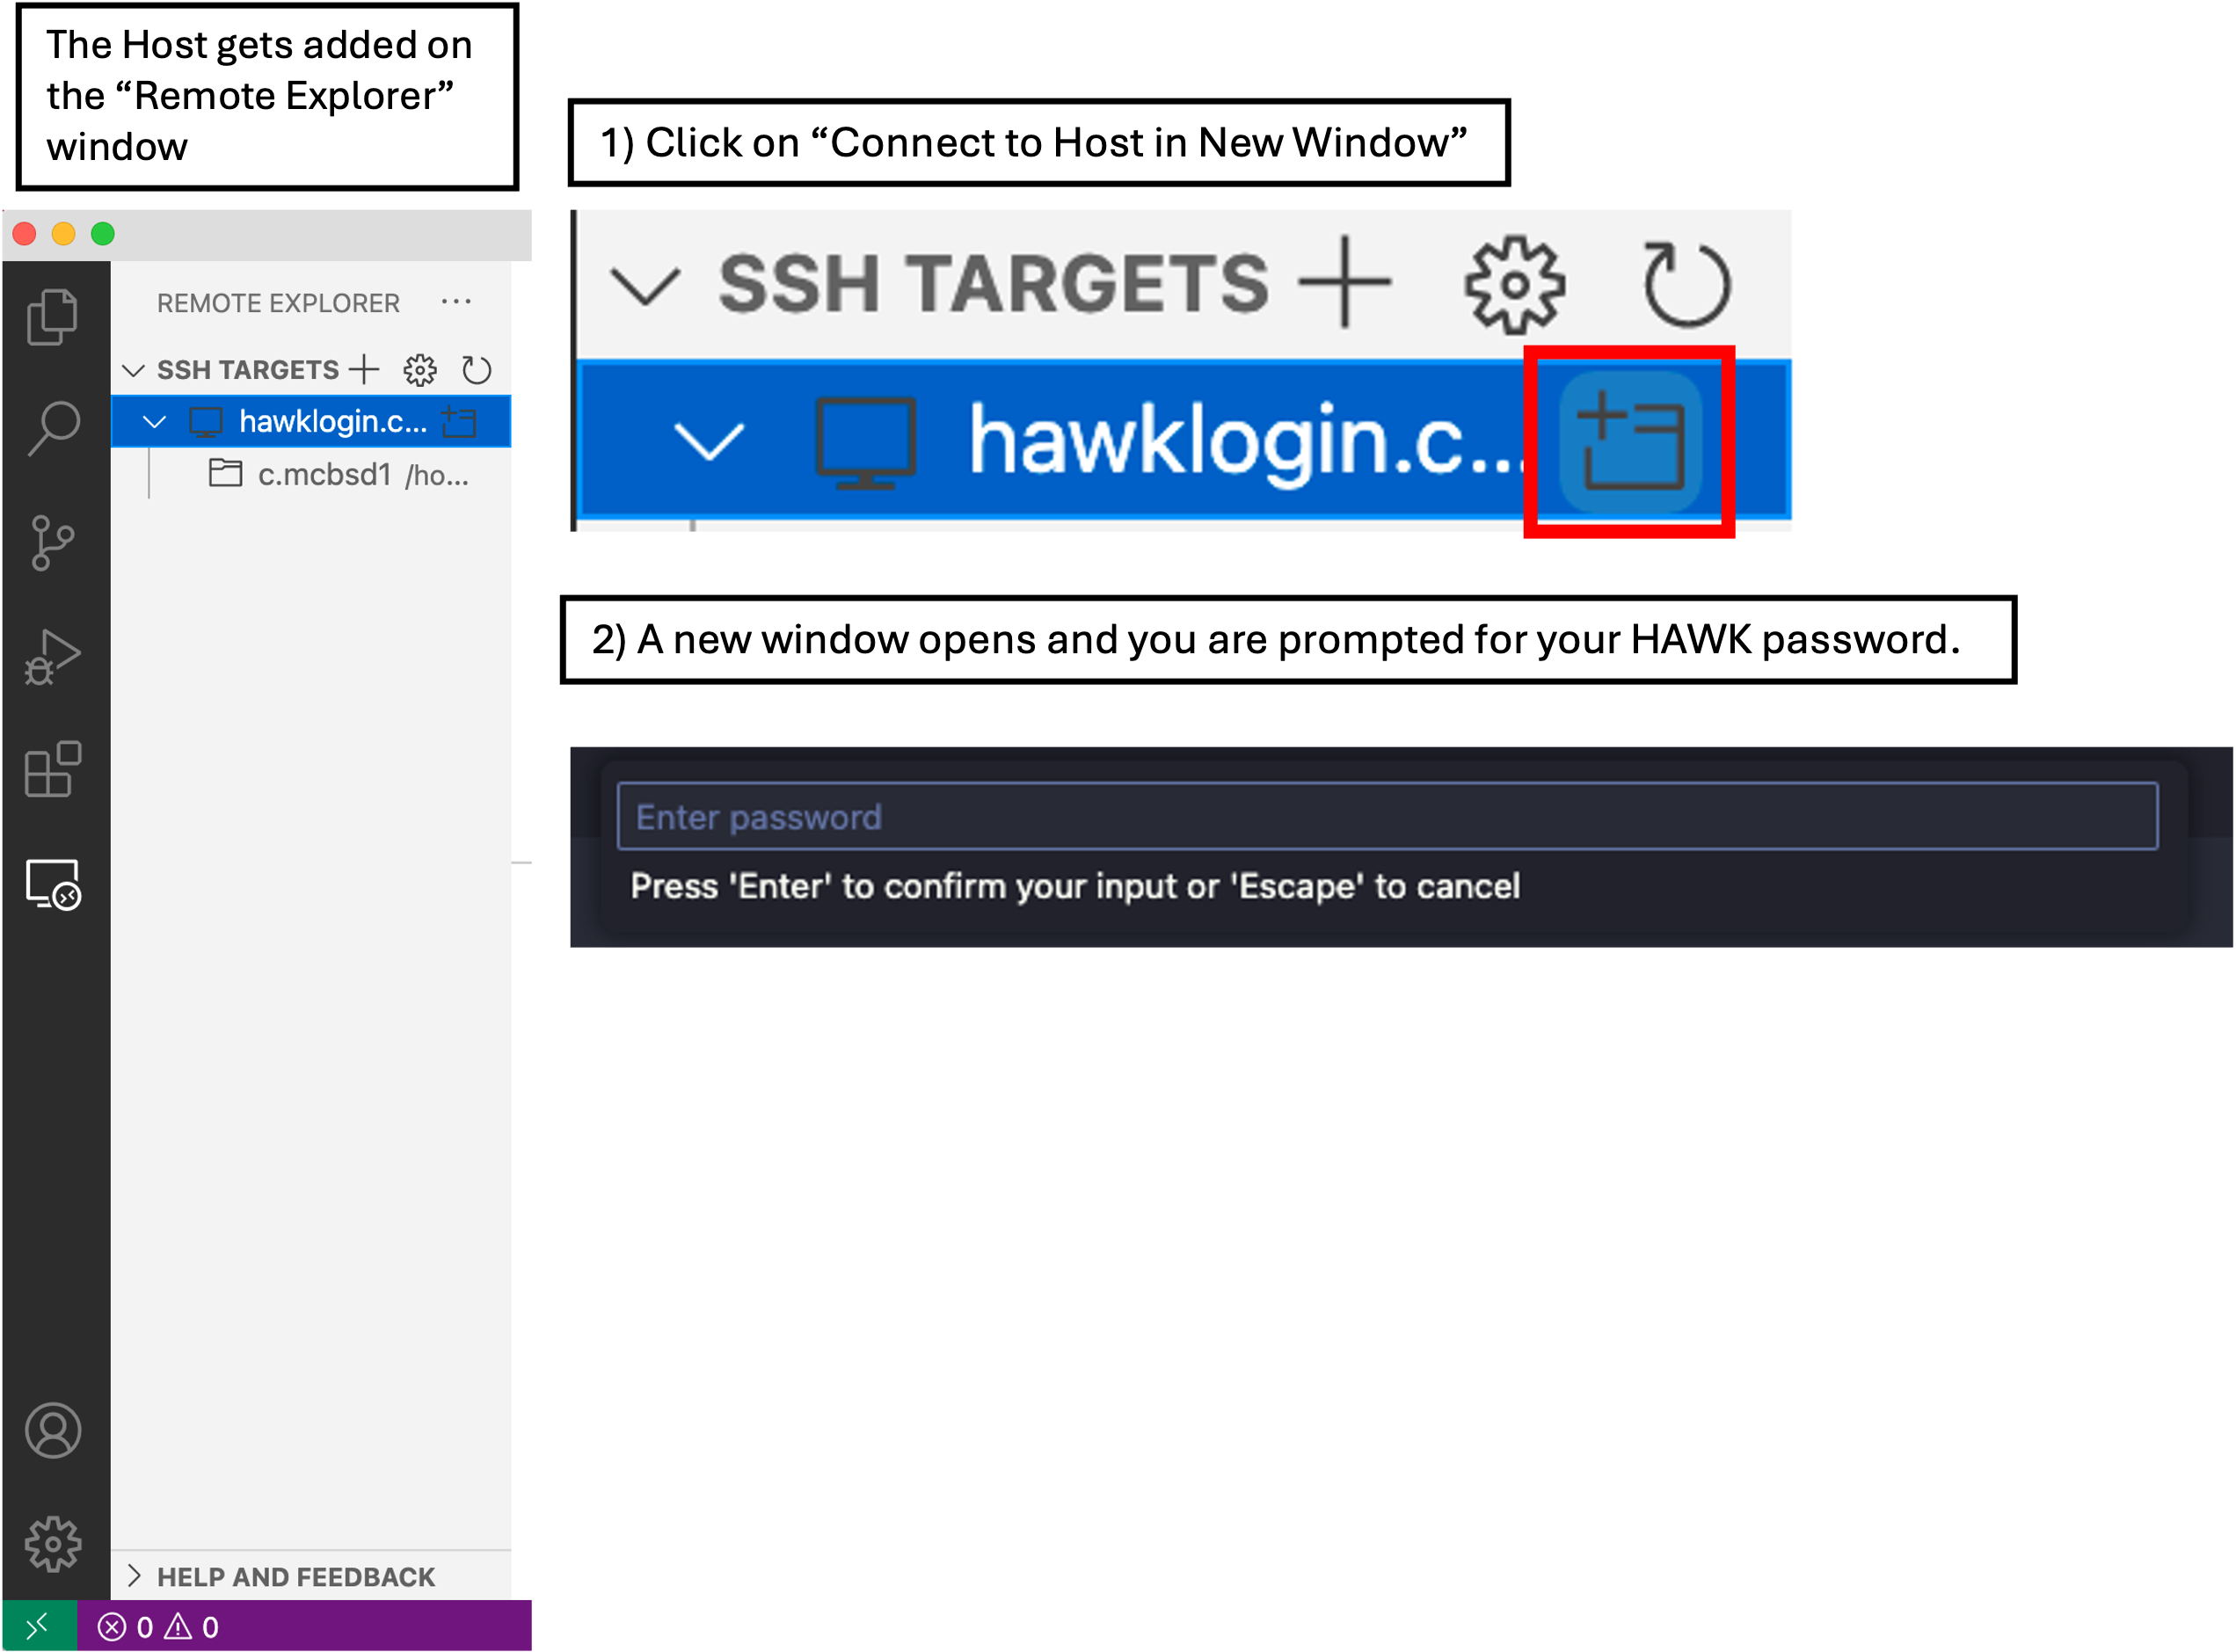
Linux Users
- In your shell, log into HAWK with:
ssh c.c1234567@hawklogin.cf.ac.uk
#Enter Password
Fetch the project from GitHub
- To get the project directory from GitHub, we simply copy and paste one line of code below.
- We will first want to move into our scratch directory.
- To do this, we first need to click on ‘Explorer’ and then ‘Open Folder’.
- A drop-down box appears at the top of the screen with a filepath. We need to change this to
/scratch/c.c1234567and then click ‘OK’. - You may be prompted ‘Do you trust the authors this folder?’. Click ‘Trust all authors’ or ‘Yes’.
- You will now see that the directory will be open on the left of the window. Note: Most of you won’t have anything here as you have not used HAWK or scratch before. Mine is populated with various directories.
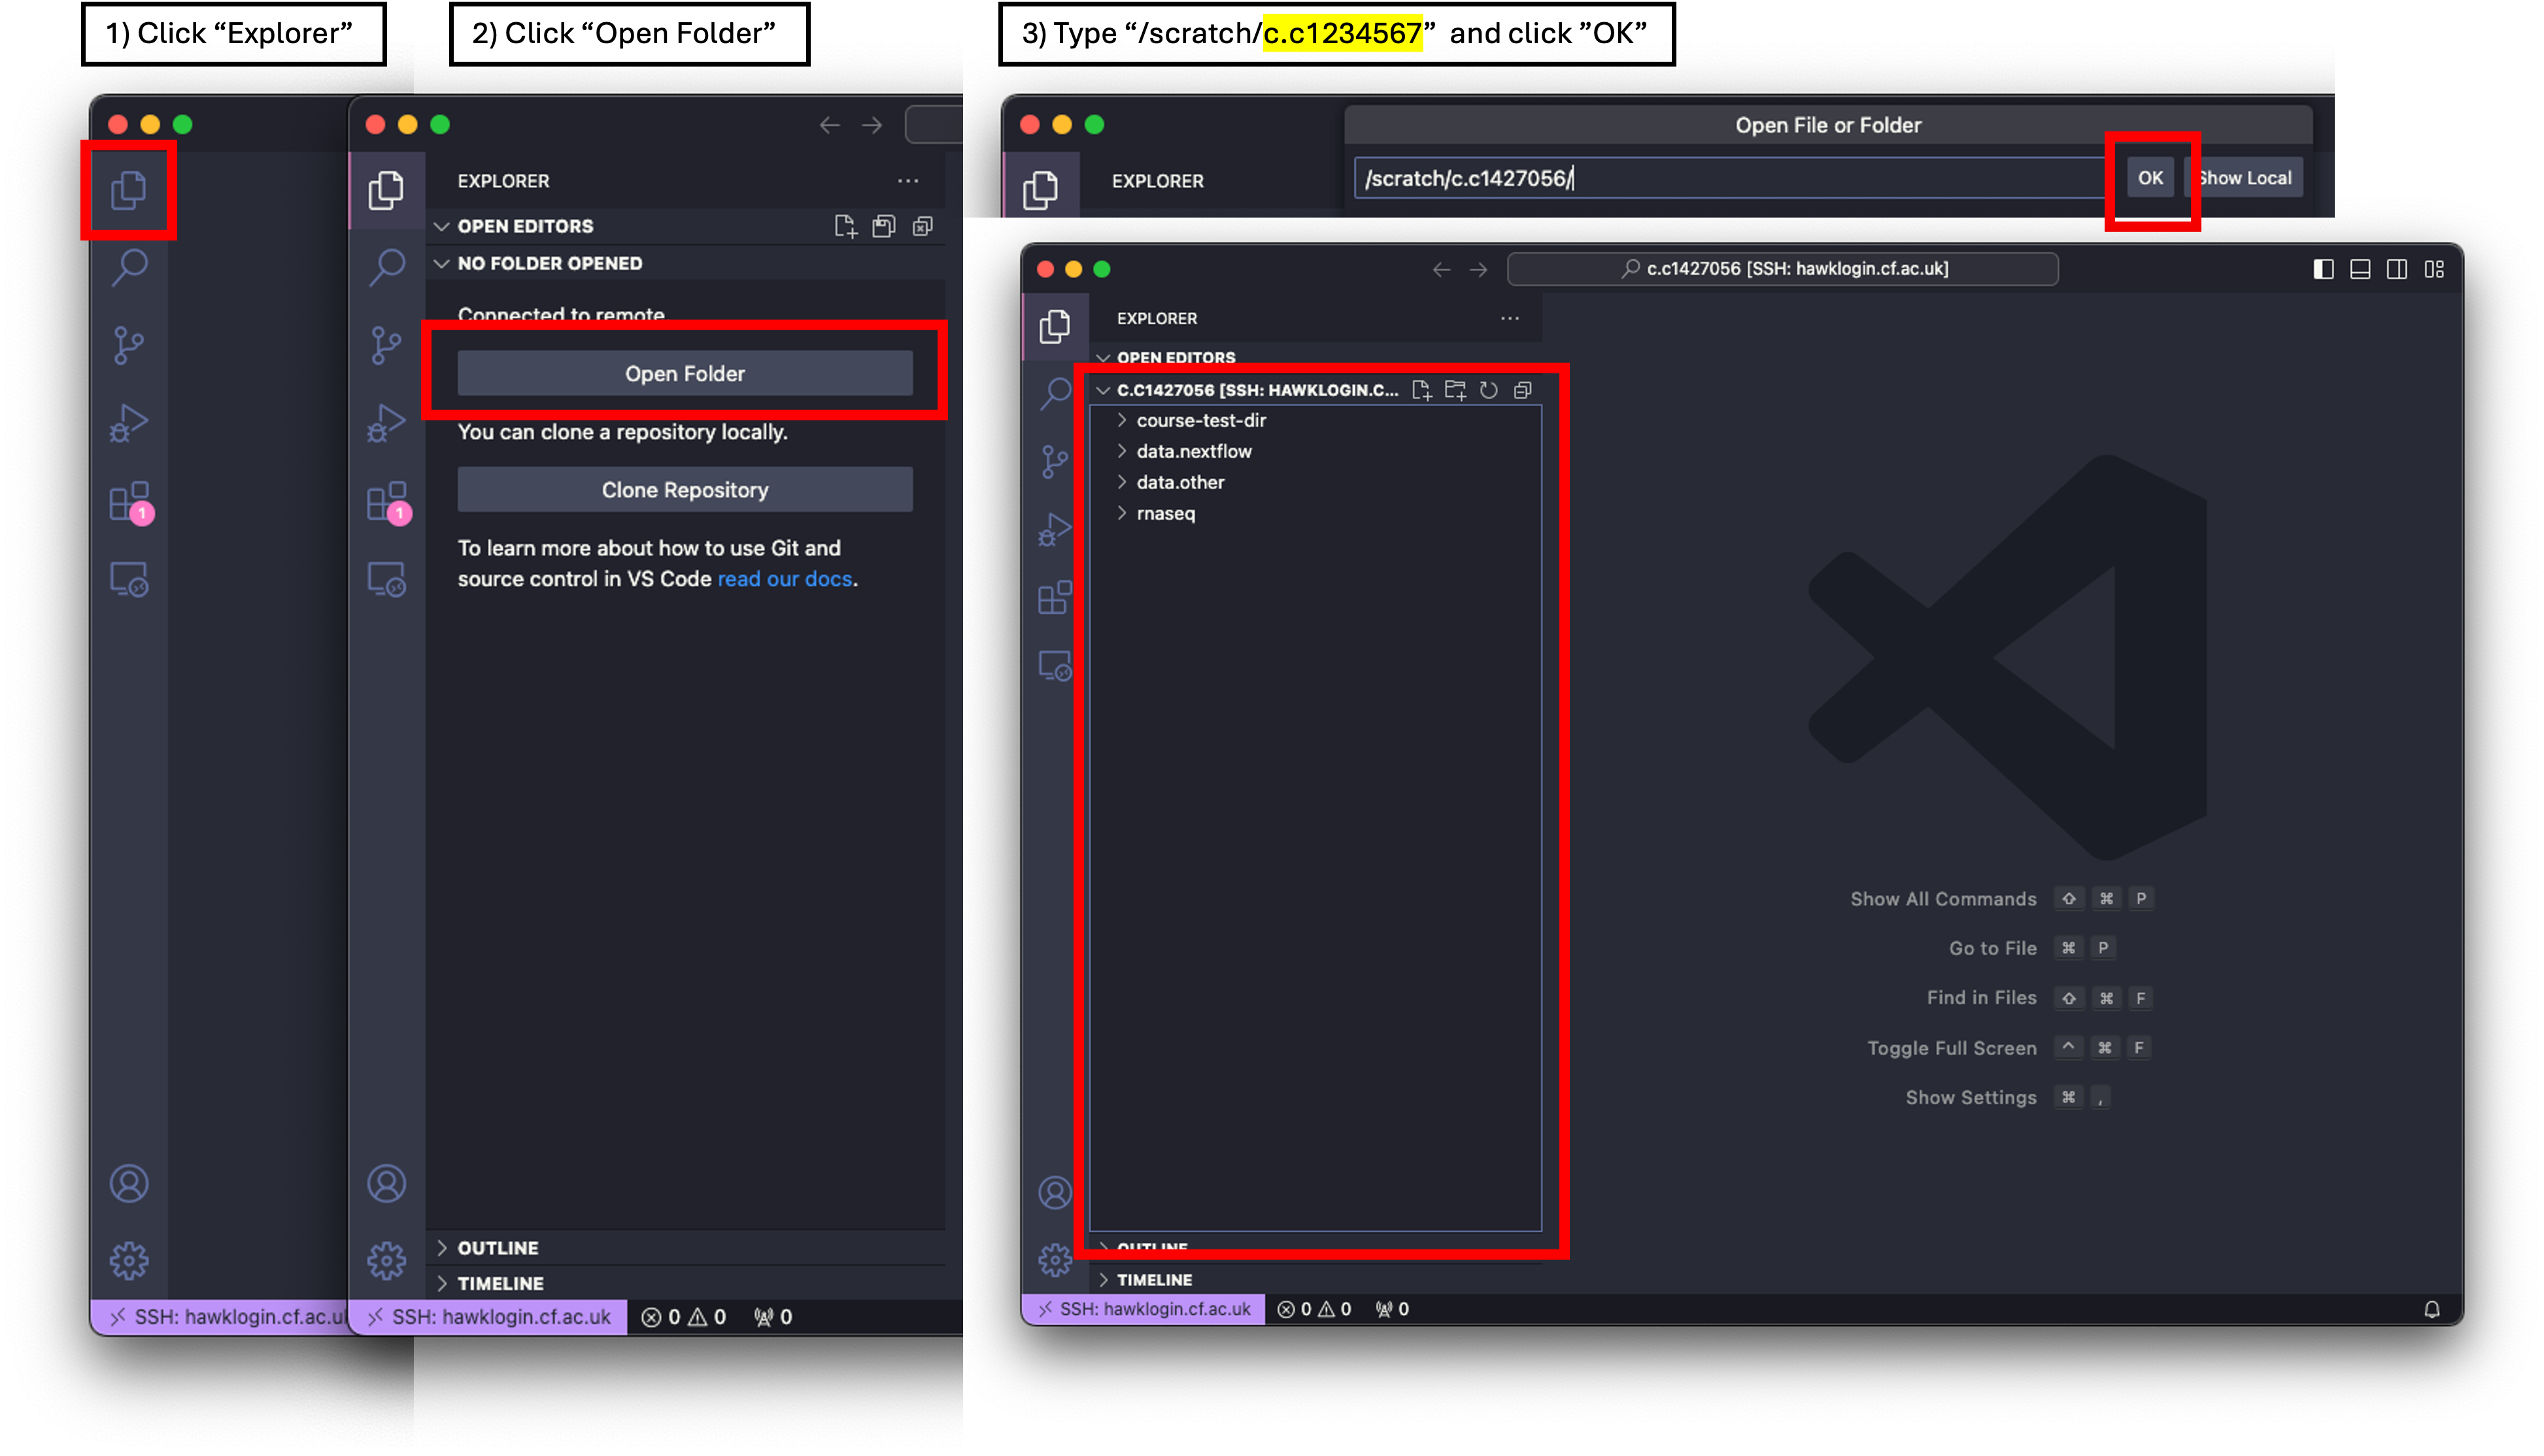
- We next want to fetch the project from GitHub. To do this, we need a terminal window open so we can paste the code into.
- Click on ‘Terminal’ at the top of your screen and select ‘New Terminal’. This will open a terminal window at the bottom of your VSCode window.
- Now we can simply paste the following code into the terminal and hit enter:
git clone https://github.com/Gibbatron/rnaseq-course.git
- You will get a notification when things are done.
- To double check if the directory has been downloaded, we can use the
lscommand. - We should also see that the directory is now in the ‘Explorer’ window on the left. This may not be the case. To update the window, we can simply click the ‘Refresh Explorer’ button.
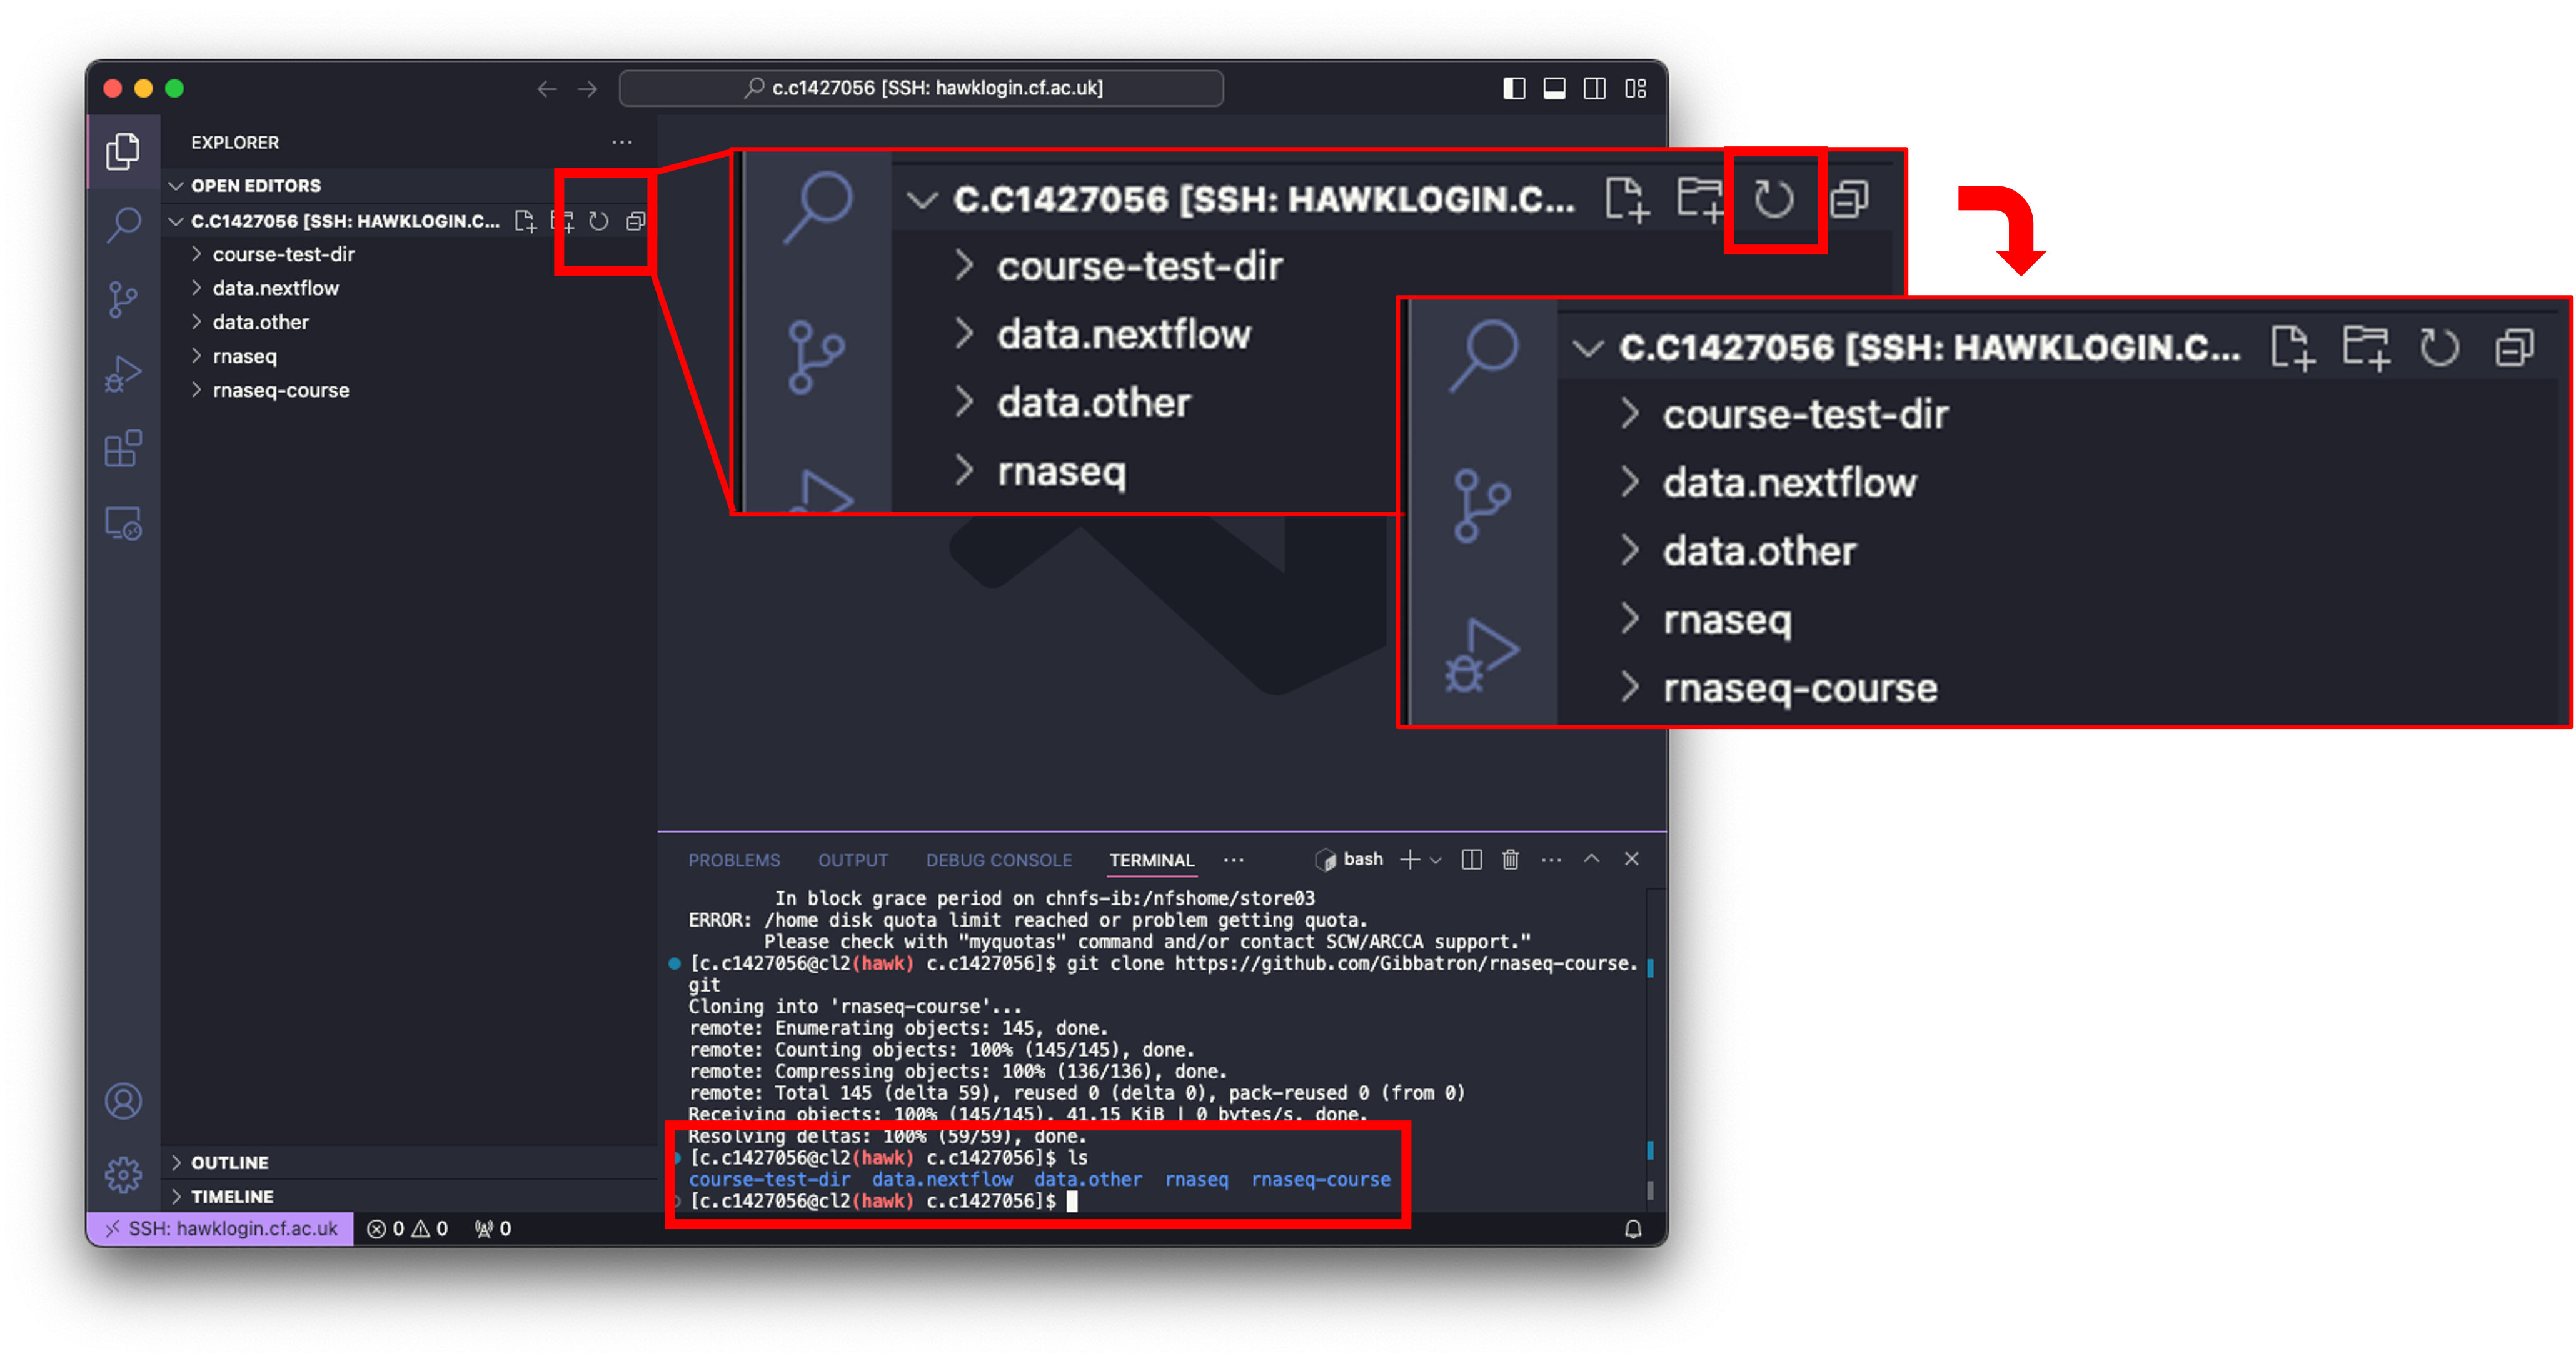
- To see the contents of the downloaded directory, you can click on it to expand, or use the drop-down arrow next to it.
Linux Users
- use
cdcommand to move to your scratch directory and then input the following command:
cd /scratch/c.c1234567
git clone https://github.com/Gibbatron/rnaseq-course.git
Set-up
- We need to change permissions of the rnaseq-course directory so that any daughter files and directories will inherit the same permissions:
- In the terminal window paste the following:
chmod -R 777 rnaseq-course #777 gives read, write, and execute permissions for everyone

setfacl -d -m u::rwx,g::rwx,o::rwx rnaseq-course #this code gives same permissions to daughter files and directories that are made.
- We also need to change permissions of the scripts in the bin directory:
cd rnaseq-course/bin
chmod +x *.sh
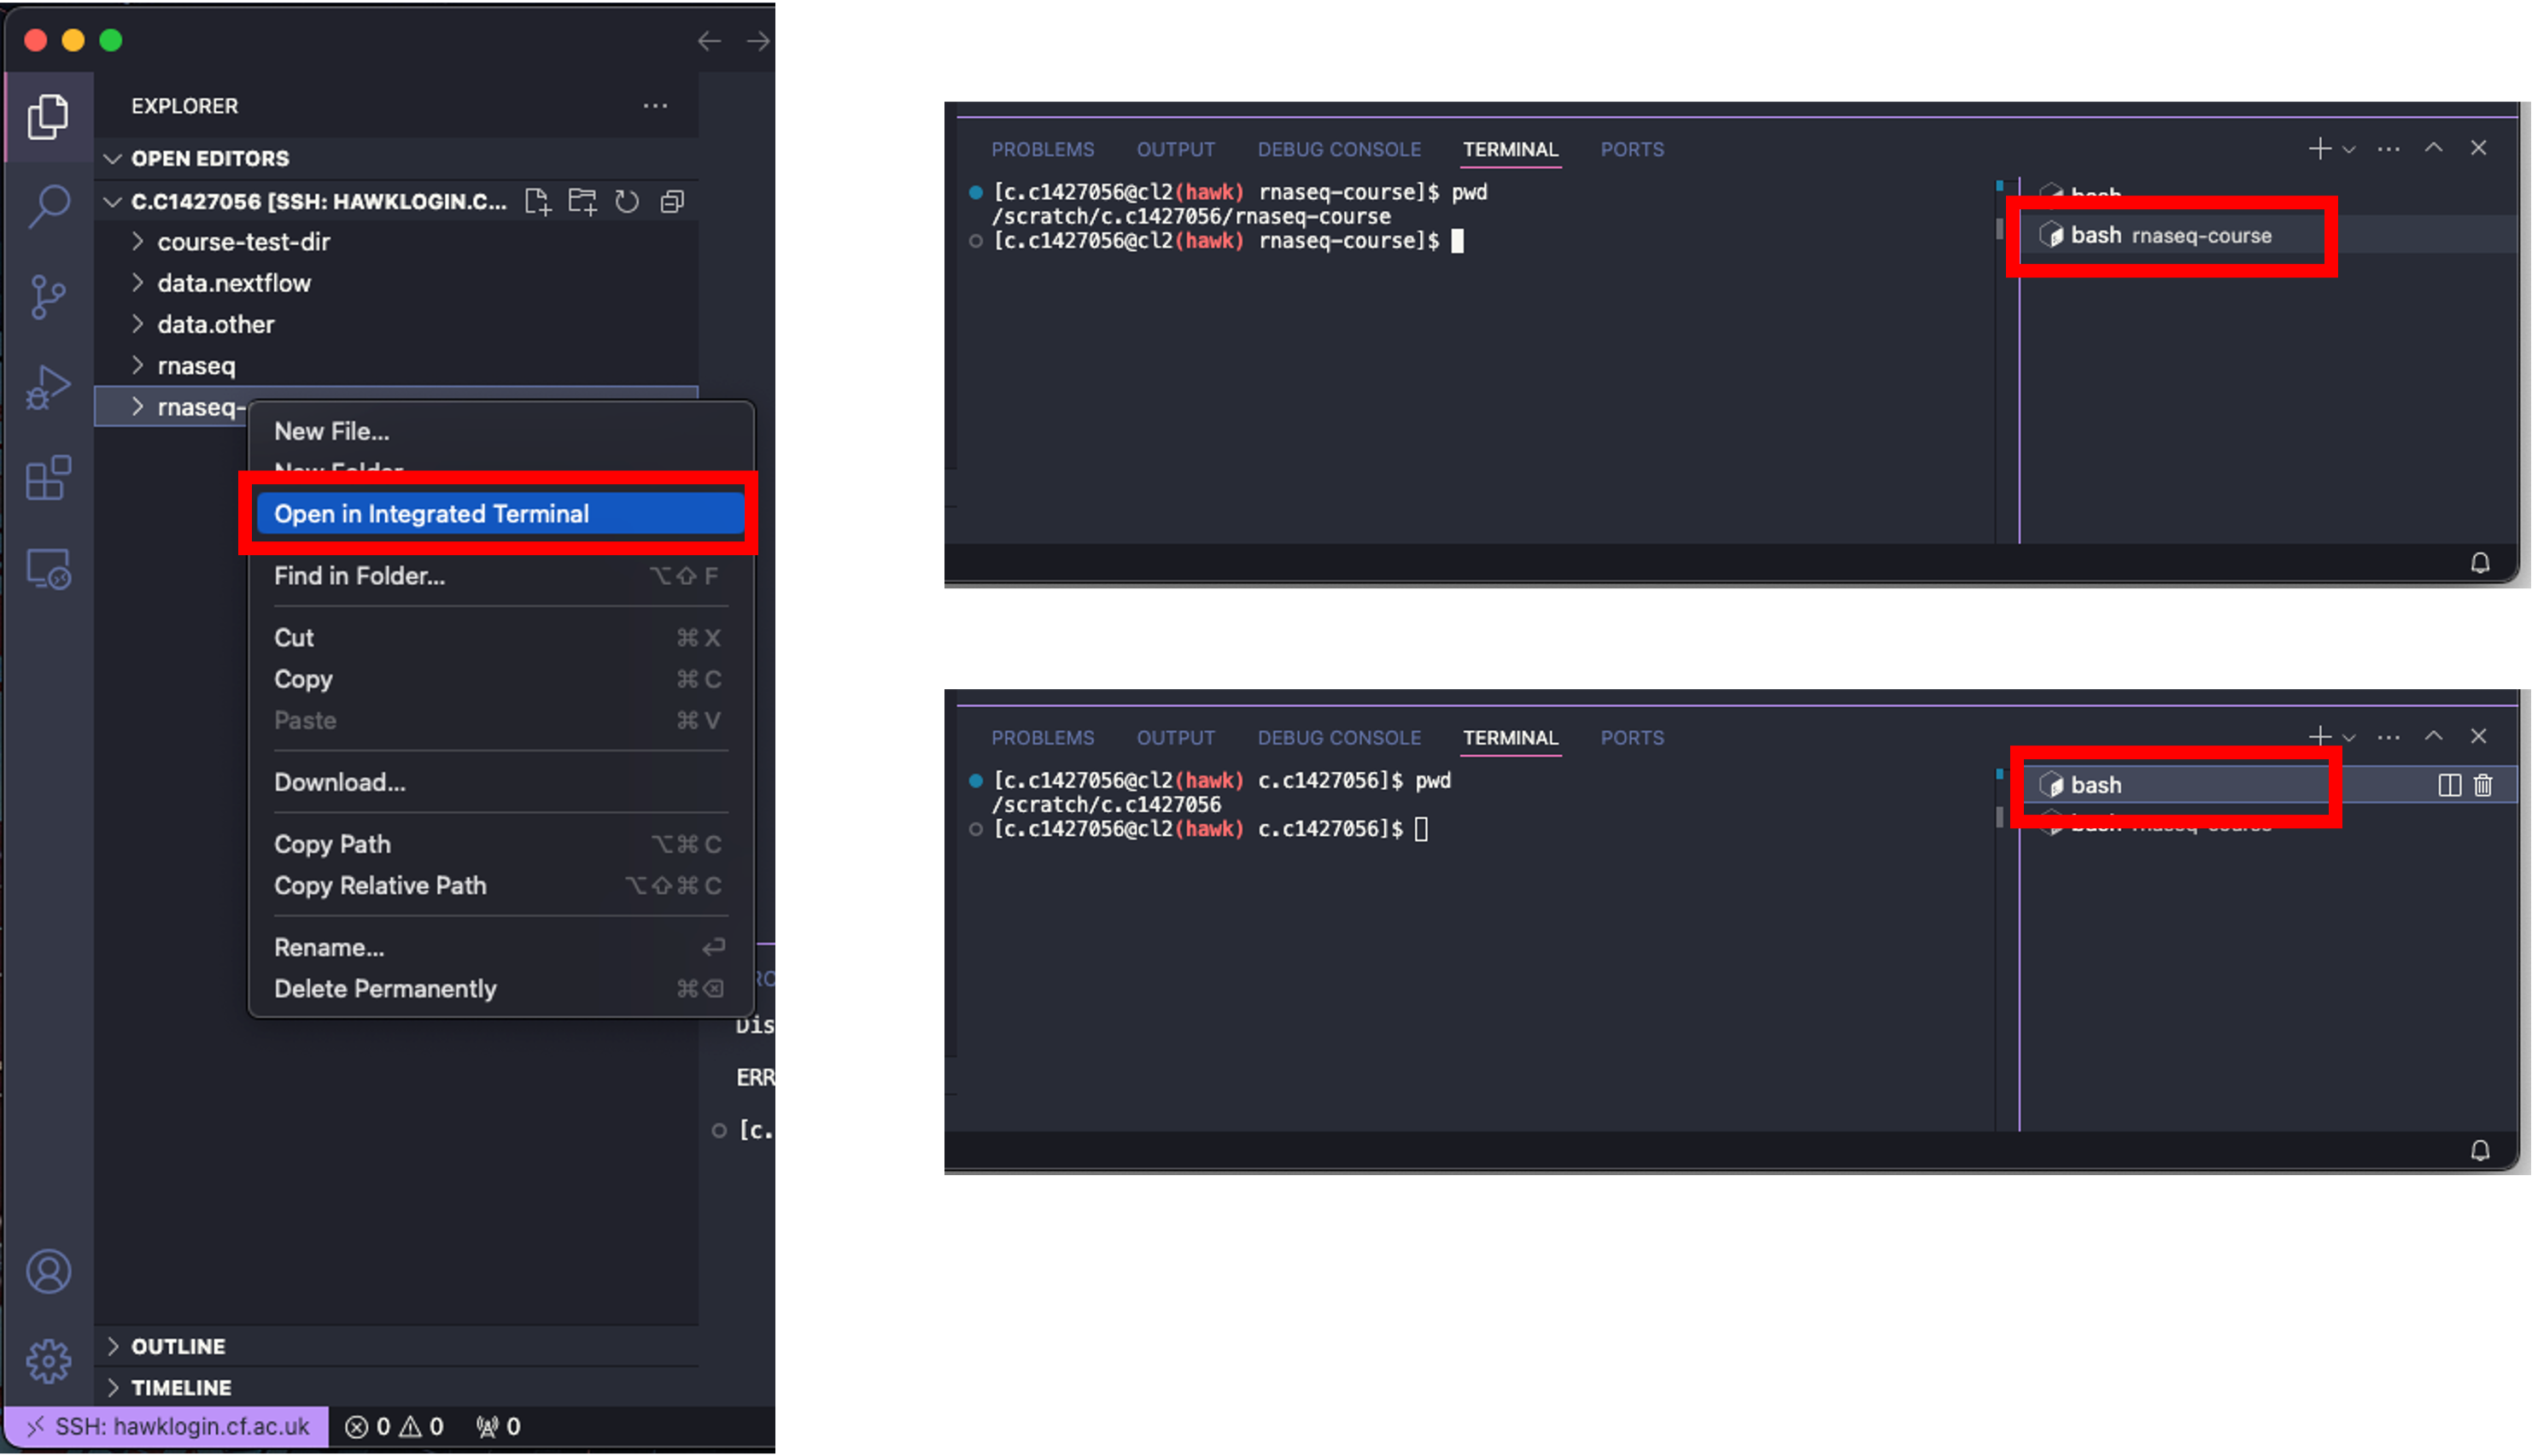
- Note: When changing directories within the terminal window, the explorer window does not update as you go, neither does it update if you click the refresh button.
- Note: You can move in- and out of directories using the explorer window. Right-clicking on the directory and clicking on ‘Open in Integrated Terminal’ will open the directory in the terminal window. There will be another section added to the terminal window on the right with two options. One named ‘bash’, the other named ‘bash rnaseq-course’. The ‘bash’ option is where you originally were (your scratch directory) and the ‘bash rnaseq-course’ option is in the rnaseq-course directory. Clicking between these moves you to the subsequent directory and you will notice the terminal window changes with this too.
Required files
- Now that we have the permissions etc completed, we can now edit the required files needed for the fetchngs pipe.
- You will see, by using the
lscommand, or clicking the drop down options on the directories that we have the following directory structure:
.
└── rnaseq-course/
    ├── bin/
    │   ├── differentialabundance.sh
    │   ├── download-ref-genome.sh
    │   ├── fetchngs.sh
    │   ├── generate-samplesheet.sh
    │   ├── make-table-diff-abundance.sh
    │   └── rnaseq.sh
    ├── resources/
    │   ├── conditions.csv
    │   ├── contrasts.csv
    │   ├── diff-abundance-params.yaml
    │   ├── example-conditions.csv
    │   ├── fetchngs-params.yaml
    │   ├── ids.csv
    │   ├── my.config
    │   └── rnaseq-params.yaml
    ├── input/
    │   ├── fastq/
    │   └── example_fastqs/
    └── output/
- Note: We will be executing the pipeline from the parent directory (rnaseq-course)
- Note: In addition to above note, all file paths are in relation to the parent directory
resources/ids.csv
- Now that we have the sample IDs, we can go ahead and add them to the
ids.csvfile. - This file is a comma-separated value (.csv) file that contains the list of the sample IDs that we just downloaded.
What is a comma-separated values (.csv) file?
- A .csv file is simple text file that stores tabular data such as text and numbers in a specific structured format. - Each line of the file corresponds to one row in the table. - Within each line, fields(columns) are separated by commas. - For example, the .csv for the table below looks like:
| Column-1 | Column-2 | Column-3 |
|---|---|---|
| input1 | input2 | input3 |
| input4 | input5 | input6 |
| input7 | input8 | input9 |
Column-1,Column-2,Column-3
input1,input2,input3
input4,input5,input6
input7,input8,input9
- To add our IDs to the .csv, we need to open
ids.csv, delete the text already there, then paste our list straight in. - To open the file in VSCode, we can click on it which will open the file in the main window, or we can right-click on the file and click ‘Open With…’. This will open a drop-down menu at the top of the screen. Select ‘CSV Editor’.
- This will load the file into the main window as a table rather than its native format - this will make it easier for you to edit and understand the structure of the file.
- I would reccomend just clicking on it to open though, as the file has only one column.
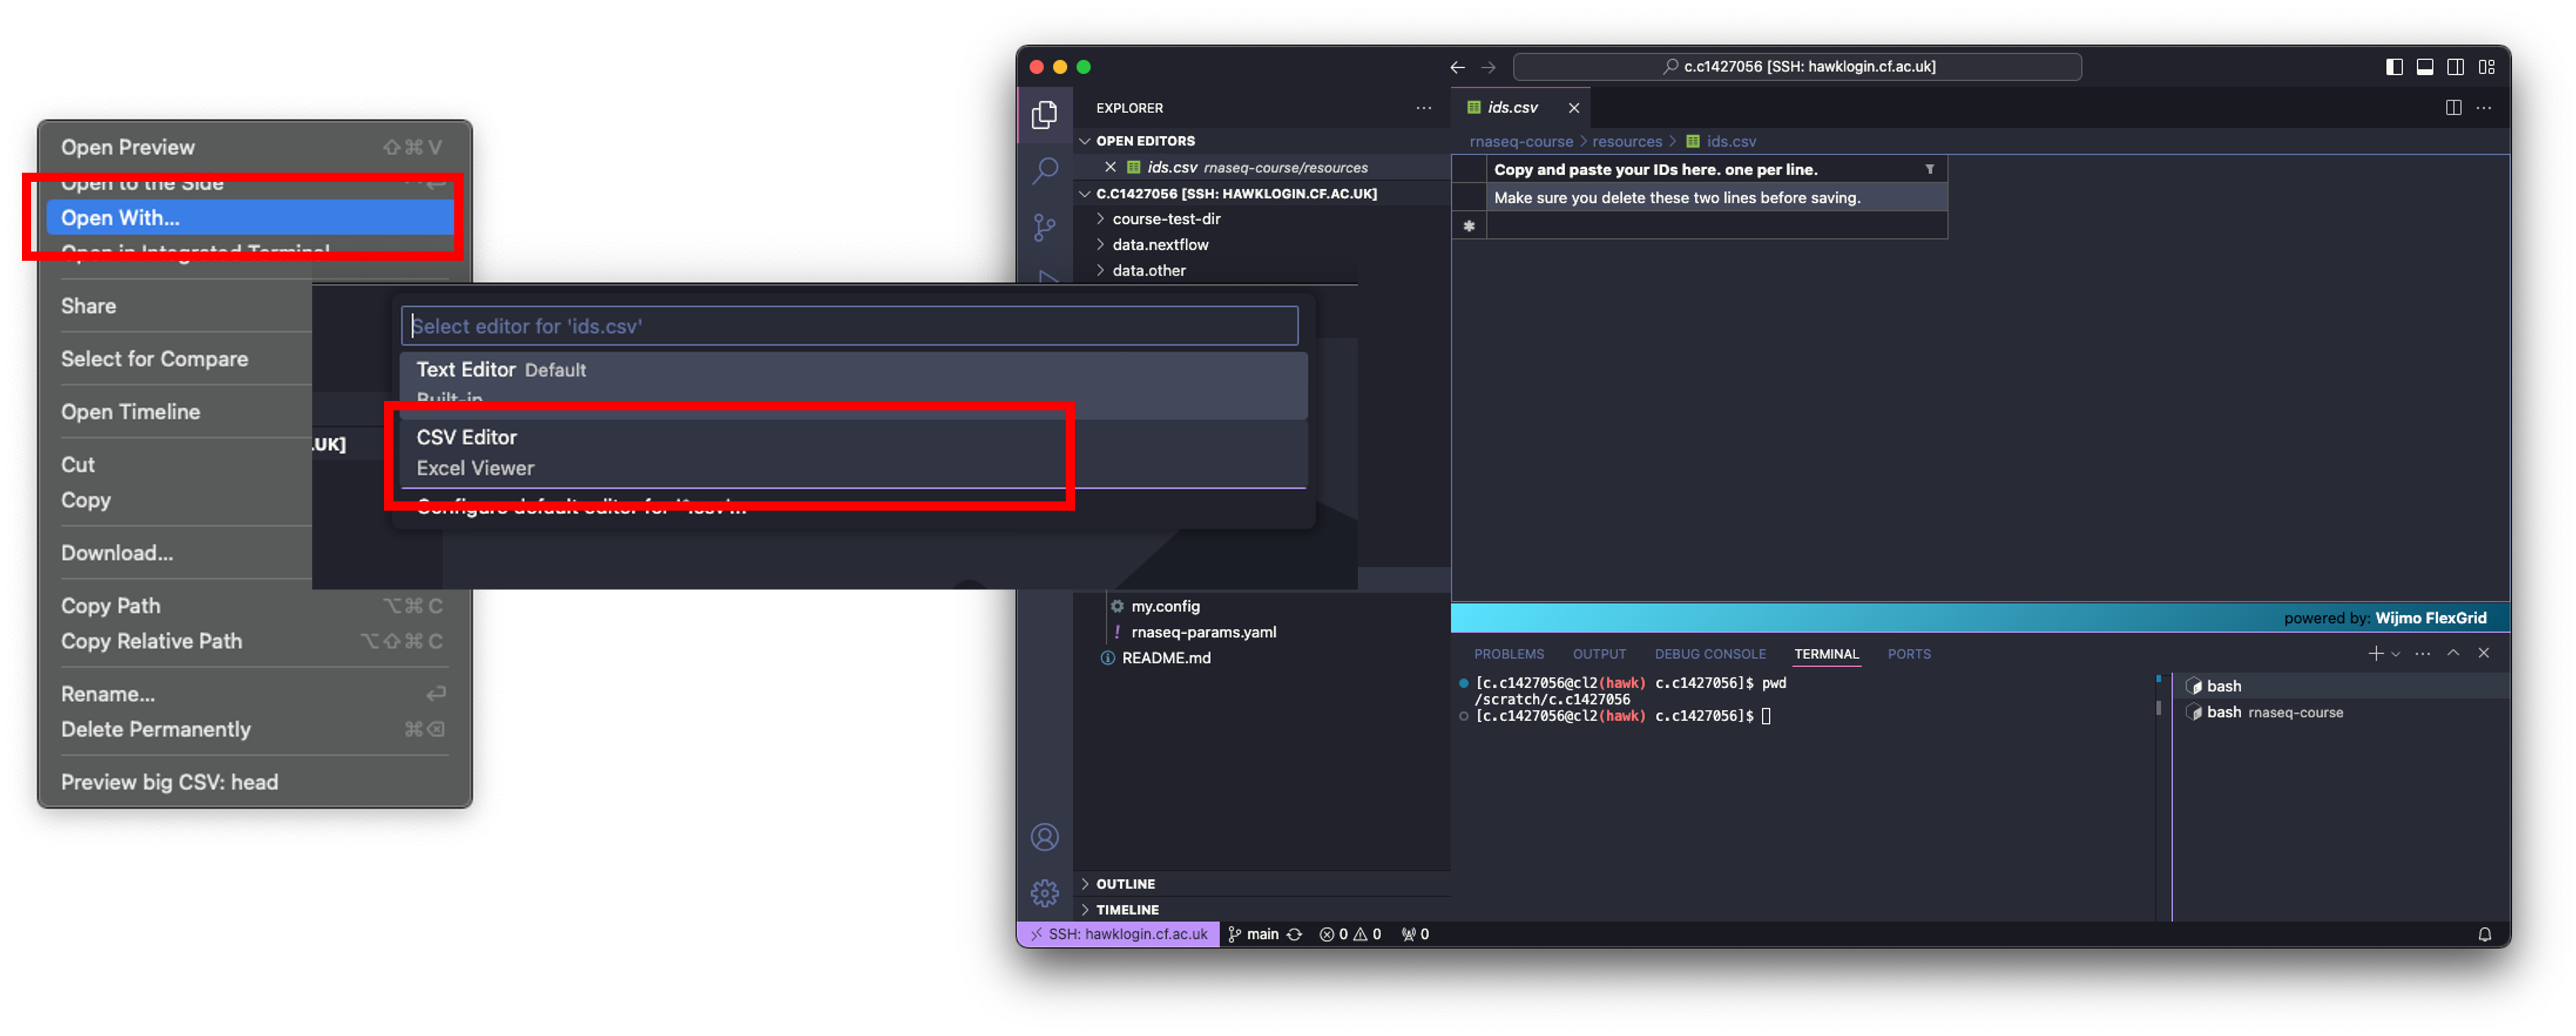
- With the file open, delete the text in both rows and paste your IDs into the table.
- Now save the table with
File > Save. - To close the file, click on the ‘X’ next to the filename along the top of your window.
Linux Users
nano resources/ids.csv

# delete the text

# paste your list in:
SRR23454118
SRR23454119
SRR23454122
SRR23454124
SRR23454125
SRR23454126

# save the file
ctrl + x
y
enter
resources/fetchngs-params.yaml
- This file contains all of the parameters needed for the pipeline to run.
-
Instead of adding all of the options into the code when executing the pipeline, we can add them into this file. This keeps things tidier and easier to troubleshoot.
-
We need to change the email address in this file.
- Open the file in VSCode by simply clicking on it, then change your email address.
- Then save the file by clicking
File > Save. Close the file by clicking the ‘X’ next to the filename along the top of your window.
Linux Users
nano resources/fetchngs-params.yaml

# change your email:
input: resources/ids.csv
outdir: input
nf_core_pipeline: rnaseq
email: <b>your-email@cardiff.ac.uk</b>

# save the file
ctrl + x
y
enter
- input: Where the input ids.csv file is located. Note: This is in relation to the parent directory.
- outdir: Where to save the outputs to. Note: This is in relation to the parent directory.
- nf_core_pipeline: Formats the output data so that it conforms with the required inputs for the rnaseq pipeline that we will be using further down the line.
resources/my.config
-
This file contains all of the configuration code required for the pipeline to run correctly on HAWK.
-
We only need to change the email.
- Open the file in VSCode by simply clicking on it, then change your email address and scw account.
- Then save the file by clicking
File > Save. Close the file by clicking the ‘X’ next to the filename along the top of your window.
Linux Users
nano resources/my.config

# change your email:

params {
  config_profile_description = 'Super Computing Wales'
  config_profile_contact = 'your-email@cardif.ac.uk'
  config_profile_url = 'https://supercomputing.wales/'
  max_memory = 180.GB
  max_cpus = 20
  max_time = 72.h
}

singularity {
  enabled = true
  autoMounts = true
}

process {
  executor = 'slurm'
  queue = 'compute_amd'
}

executor {
  queueSize=10
}

process {
beforeScript = 'module load singularity-ce/3.11.4'
clusterOptions = '--account=scw2345'
}

# save the file
ctrl + x
y
enter
Executing the nf-core/prefetch pipeline
- Now we have everything ready to execute the pipeline.
- To run the pipeline, we need to be in the parent directory (rnaseq-course) directory.
- We will be using tmux to execute the pipeline.
What is tmux?
- Tmux is a tool that we use to run multiple terminal sessions at once. - We can use tmux to run our pipelines in the background, which leaves us to do other tasks in the meantime, or logout. - If we were to run the pipeline without tmux, we would have to stay logged into HAWK until the pipeline has finished running. - This can be problematic because 1) most pipelines can take a VERY long time to run, and 2) connection problems. If you are disconnected for any reason, the pipeline will cancel. - Using tmux allows us to open a new terminal window, run the pipeline, and close the session so that it runs in the background. - We can then log out of our HAWK session and log back in once we have been notified of the pipelines completion.Change to the cla1 node
- Jan’25 update: we need to change to the amd compute node for the purpose of this course.
- To do this, enter the following in the terminal window:
ssh cla1
- You will be prompted continue. Type ‘yes’.
- There will be text on the screen saying ‘One-time SSH cleanup for Hawk gen 2…’.
- Wait for this to complete, you will then see ‘…done’.
Launch a tmux session
- From the parent directory (
rnaseq-course- you will need to use the cd command to get there), run the following in the terminal window:
cd /scratch/c.c1234567/rnaseq-course/
module load tmux
tmux new -s fetchngs
- This loads the tmux module in HAWK and opens a new tmux session called fetchngs.
Load Modules
- With the tmux session opened, paste the following:
module load nextflow/24.10.4
module load singularity/singularity-ce/3.11.4
- This loads the required modules for the pipeline to run.
Execute pipeline
- Now we can go ahead and execute the pipeline.
- Usually, we would run the pipeline by typing out the command followed by the options etc etc.
- To make thinks simpler for everyone, and to avoid typos etc, I have added this command to a script (
bin/fetchngs.sh). - To execute the pipeline, all we need to do is run this script:
./bin/fetchngs.sh
- This will run the pipeline for us. Leave the pipeline run for a few minutes to ensure it is working, then we can close the session by doing the following:
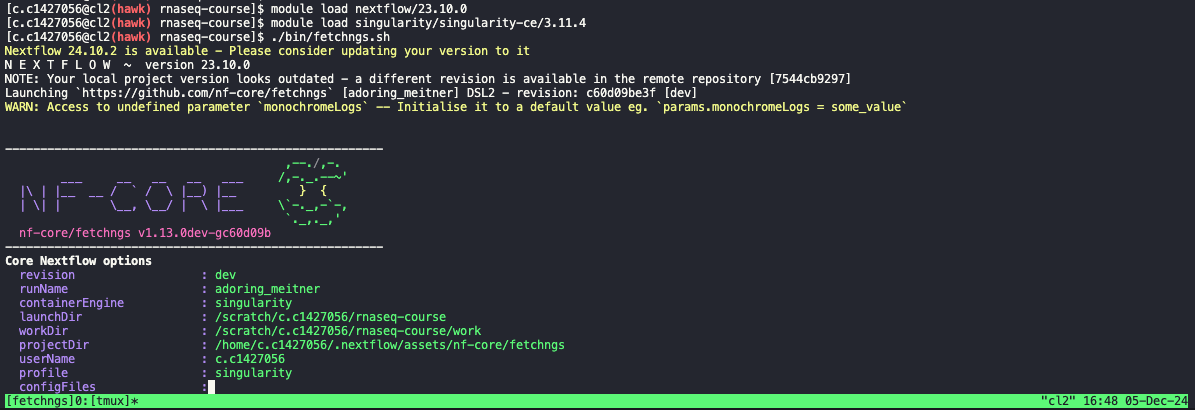
Ctrl + b

then press d
- We will cover the outputs from this pipeline during the Day 2 session.